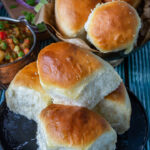
Eggless Ladi Pav Bread Buns Recipe | Mumbai Pav | Eggless Dinner Rolls Recipe | How to make soft bun bread at home
Step by step guide for Eggless Ladi Pav Bread Buns Recipe to make soft, light & fluffy Mumbai Pavs at home.
Servings: 5
Ingredients
For Proofing Yeast:
- 3/4 Cup milk
- 1 tbsp Sugar
- 1.5 tsp Active Dry Yeast
For the Dough:
- 2 Cups All Purpose flour
- 3/4 tsp Salt
- 1 tbsp Milk Powder Optional
- Proofed Yeast Liquid
- 2 tbsp Butter or Oil
- Extra flour for kneading the dough
Other Ingredients:
- Extra Butter and flour for greasing and dusting the pan
- Milk and butter for brushing pavs
Instructions
- Proofing yeast:
- Warm milk in a bowl, add sugar and then yeast. Mix well and keep in a warm place for 10 to 15 minutes till it becomes frothy.
- Preparing the dough:
- In a bowl add flour and salt. Mix and make a well in the centre and add the yeast mixture. Knead to a soft pliable dough adding the butter. Knead for at least 10 too 15 minutes. Watch video for reference.
- Transfer the dough to a big bowl, cover and keep aside in a warm place about one hour.
- The dough will rise and double in volume.
- Knead for another 2-3 minutes adding a little flour, if it’s too sticky.
- Divide dough to equal portions and make a round shape.
- Grease a cake tin and place the dough balls close to each other.
- Now cover the tin and keep aside for half an hour till they rise.
- Brush pavs with milk.
- Baking Pavs:
- Preheat your oven to 200°C and bake for 16 to 20 minutes or till done to get a brown colour.
- Remove and brush top of pav with butter..
Recipe Video
Notes
- Proofing yeast is very important. Very hot milk or water will kill yeast and cold milk or water will not activate yeast. So the temperature should be warm (lukewarm).
- Don’t bring salt in direct contact with yeast, it will not proof properly.
- Including milk powder in the flour to give a slightly sweeter taste to the pavs is optional.
- A large, smooth work surface is necessary for kneading dough. Make sure that the work surface is clean before kneading the dough.
- Kneading is the key to perfect pavs. Kneading develops gluten and makes the dough soft and elastic. You can also use a food processor with dough making blade to knead the dough. If you do not knead properly,, gluten will not be formed & pav turns crumbly.
- If you add too much flour while kneading, pav turns dry.
- Place dough in fridge for overnight proofing. If you want to make the next day.
- Always keep the dough covered to prevent from drying.
- Tightly roll the dough for perfect shape.
- Place the pass close to each other so that they stick to each other after second proofing & this way the edges will not dry out & you get soft pavs.
- Give a milk wash for egg wash for that golden coloured pavs.
- Preheat oven to the required temperature before placing the tray into the oven.
- If you over bake, it will result in harder pavs.
- Once pav is out of the oven, remove them from the baking tray and allow them to cool down on a wire rack. If allowed to sit too long in the baking tray they will turn moist at the base due to heat condensation and you will get soggy pavs.
- When you first remove the pav from the oven they might feel hard on the top. They will be super soft as they cool down. Also brushing the top with butter softens the pavs.
- You can also use whole wheat flour to make pavs. All purpose flour has more gluten compared to wheat flour. So pavs made with all purpose flour are softer and fluffier compared to whole wheat.