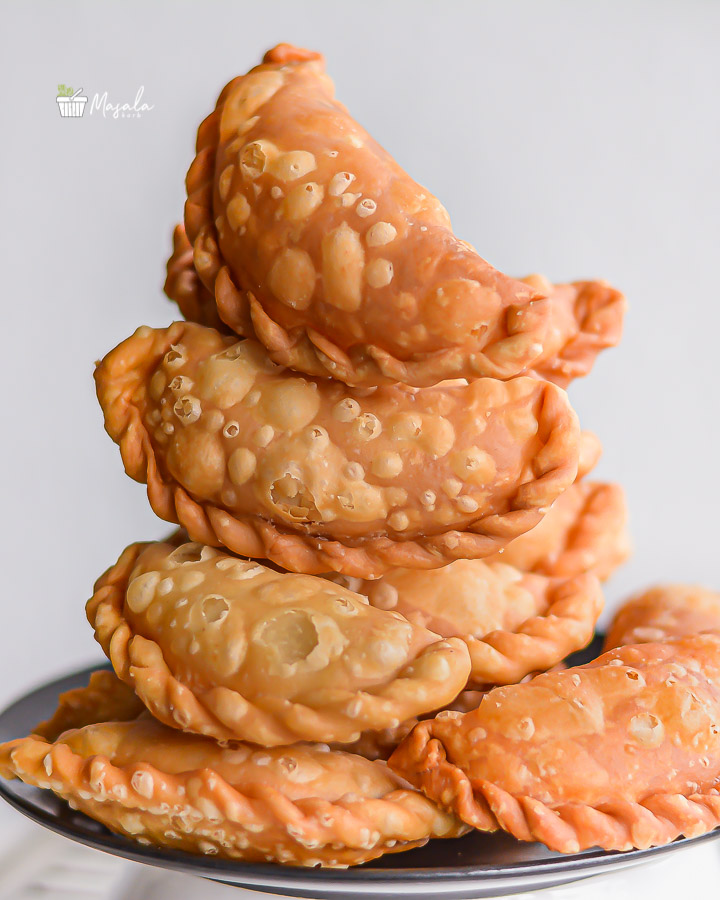
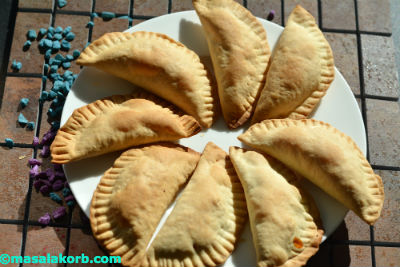
Kajjikayalu Traditional and Baked Versions – Bellam Kajjikayalu | Suji Gujiya Recipe Without Mawa, A very popular traditional sweet prepared for Sankranti in Andhra. It has a crispy exterior filled with the subtle flavours of dried coconut, roasted semolina, nuts & jaggery laced with a tinge of cardamom.
 I’m posting this recipe for Kajjikayalu traditional and baked versions as a part of the blog hop event titled “Holi specials”. Before moving on to the recipe for Kajjikayalu Traditional and Baked Versions, a few word on Holi…
Holi is celebrated in India in the month of Phalgun (February – March), on full moon as per the Gregorian calendar. Holi festival may be celebrated with various names and people of different states might be following different traditions. But, what makes Holi so unique and special is the spirit of it which remains the same throughout the country and even across the globe, wherever it is celebrated.
It is believed that it is a time of enjoying spring’s abundant colours and saying farewell to winter. The gloom of the winter goes as Holi promises of bright summer days. Fields get filled with crops promising a good harvest to the farmers and flowers bloom colouring the surroundings and filling fragrance in the air.
Holi is a spring festival full of music, colour, love and food. From early in the morning, people start the merriment by smearing each other with colours and feasting in between on the various goodies prepared at home. No Indian festival is really complete without food. And Holi is no exception to this rule. There are quite a few delicacies that are associated with this merry festival. Thanks to wikipedia for the information and click on the link to know more.
What are Kajjikayalu:
It is a very popular traditional sweet in Andhra Pradesh. Today I have for you a recipe for Kajjikayalu traditional and baked versions. But this sweet is not just limited to Andhra or southern India. It is called ‘Gujia’ in the Northern parts of India, which is a very special sweet prepared during Holi. The filling for Kajikayalu is a mixture of roasted semolina, poppy seeds, nuts, a subtle sweet flavour of dry coconut and sugar laced with a tinge of cardamom. It is not an overly sweet dish. Every bite of this crescent shaped sweet with a crispy, flaky exterior and cardamom flavoured sweet filling leaves you crave for more. Coconut can be used in a myriad of ways for desserts and it is the coconut, which makes this indulgent sweet incredibly moreish .
.
Off to the recipe for Kajjikayalu traditional and baked versions!!
This post is a part of the BLOG HOP event “HOLI SPECIALS”. Do check out many more delicious and exciting recipes of the girls from the blog hop family- Piyali, Anu, Shubha, Vani and Jayashree.

Step-by-Step process in making
Kajjikayalu traditional and baked versions:
The process involves the following main steps:
Preparing-
- The dough
- The filling
- Shape for kajjikayalu
- Deep-fry method
- Baking method
Let’s go through each of these steps in detail-
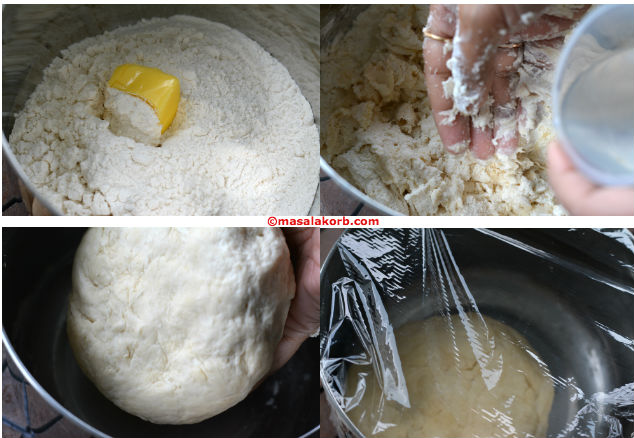
1. Preparing the dough for Kajjikayalu Traditional and Baked Versions:
- Mix flour with little salt, butter and enough water to make a pliable dough.
- The dough shouldn’t be too soft.
- Set aside covered for half an hour.
In the mean time prepare the filling.
2. Preparing the filling for Kajjikayalu Traditional and Baked Versions:
Today I will walk you through 3 types of fillings.
- Sugar filling
- Jaggery filling
- Combination of sugar and jaggery filling
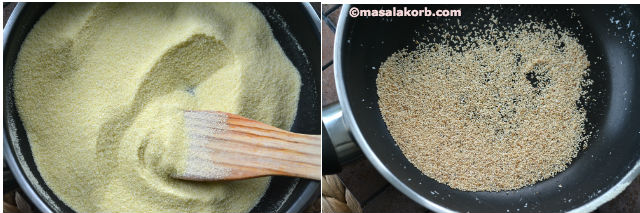
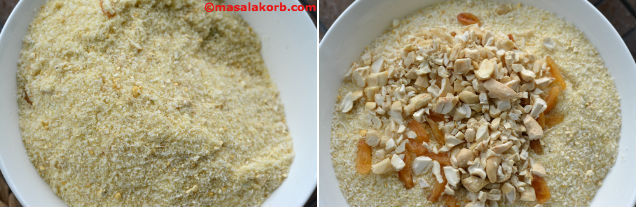
Grab all the ingredients required for the filling. The filling requires roasting, powdering and chopping of few ingredients.
Roasting ingredients: Semolina and Poppy seeds
- Heat a small pan over medium heat and dry roast semolina and poppy seeds separately one after the other till fragrant. Turn off the heat and set aside.
- Roasting desiccated coconut (dried coconut) is optional. You must dry roast in case you are using raw coconut.
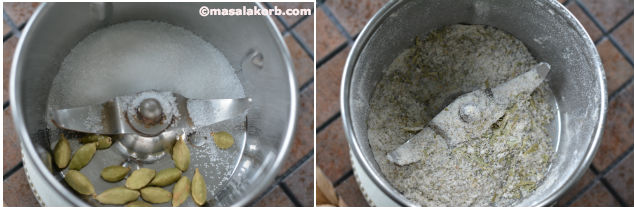
Powdering ingredients: Roasted chickpeas and Cardamom
- Grind roasted chickpeas to a coarse powder in a blender and set aside.
- Grind cardamom pods (with or without skin) along with some sugar in a blender to a fine powder. Cardamom pods with skin have more aroma.

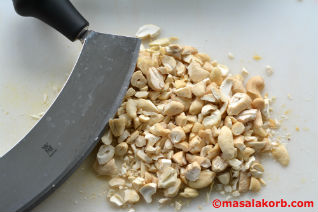
Chopping Ingredient: Cashews
- Finely chop cashews to small pieces.
Mixing all ingredients for filling:
- Refer to the recipe card at the end of the post for exact measurements.
- Mix together all the roasted and powdered ingredients along with chopped nuts and raisins.
- For the sugar filling, add to the above mixture 1 to 1½ cups of sugar and mix well.
- If you want jaggery filling, replace sugar with 1 to 1½ cup jiggery and mix.
- For sugar and jaggery filling combine both sugar and jiggery in the ratio 1:1 and mix.

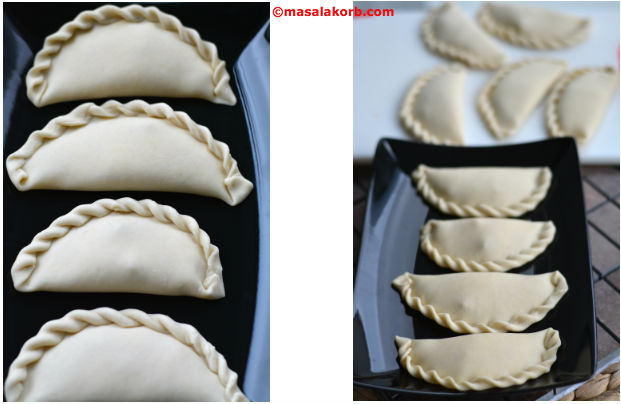
3. Preparing shape for Kajjikayalu Traditional and Baked Versions:
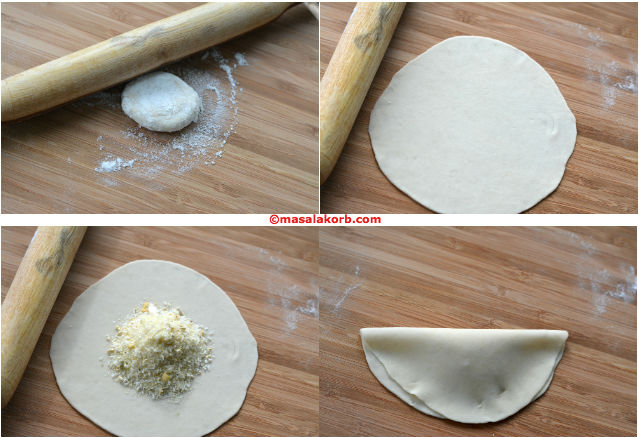
- Divide the dough (set aside) and shape into small balls.
- Now, roll each ball with the rolling pin into a thin circle.
- Spread a tablespoon of the filling on one half of the rolled out dough or in the centre.
- Wet your finger with water and run it along the circumference of the spread out dough (This helps the edges to stick if the dough is too dry).
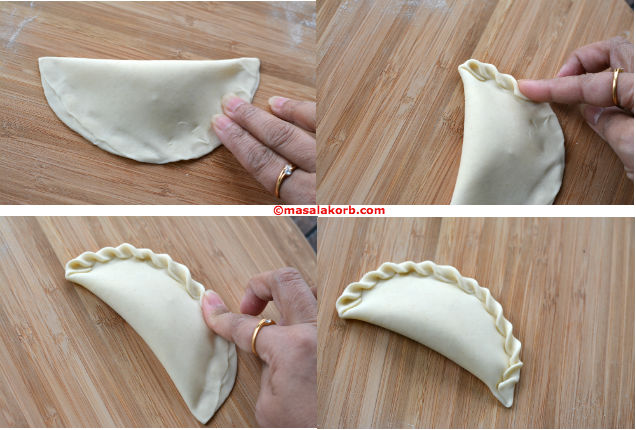
- Fold over to the opposite end, enclosing the stuffing to form a semi-circle. Press the ends firmly so that the filling doesn’t come out during the deep-frying process and twist the edges around the kajjikaya as shown in the picture below.
- Repeat the process till the dough is done.
Now we have to fry the kajjikayalu. Today I will show you both the traditional deep-fry method and the healthy baking method.
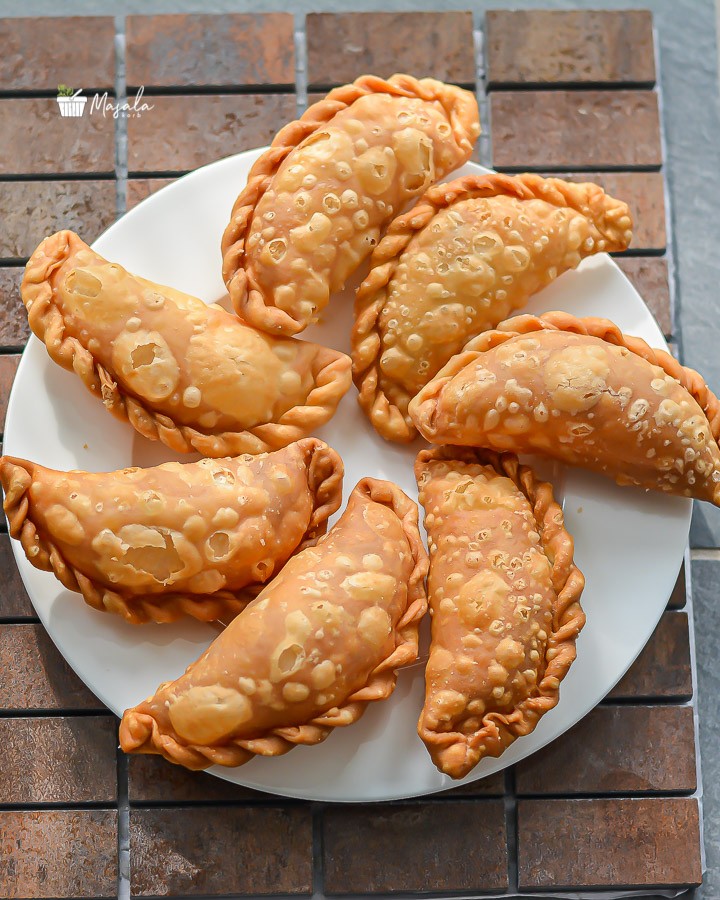
4. Deep-fry method:
- Heat enough oil in a wide pan over medium low heat to deep fry the stuffed kajjikayalu.
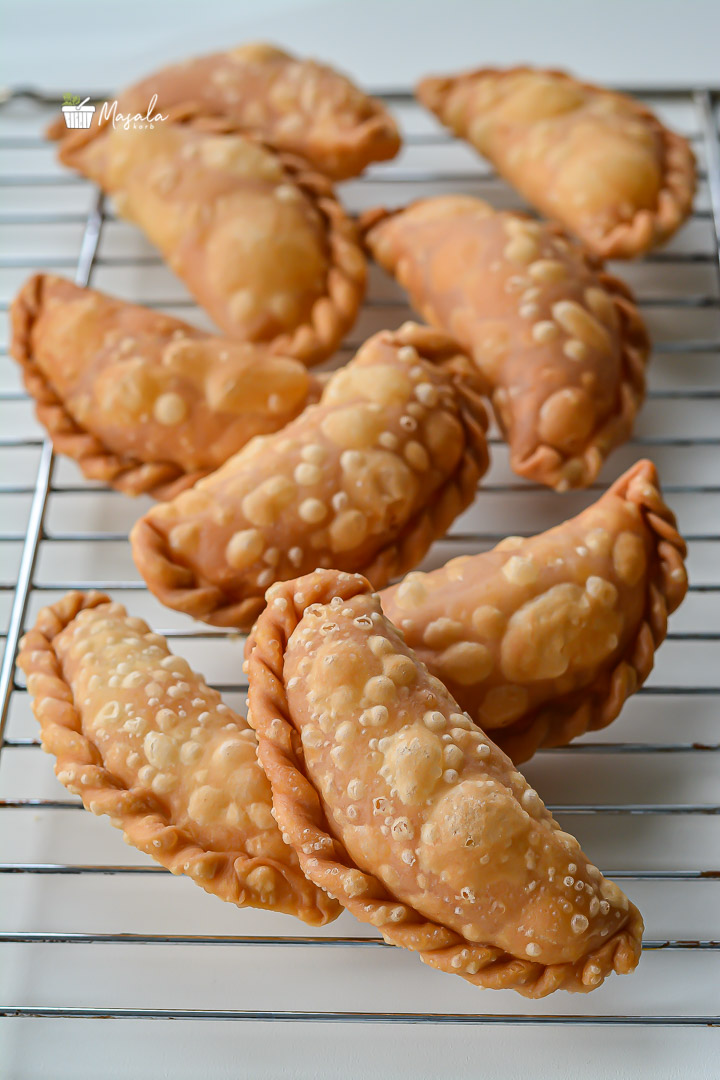
- Drop 3-4 kajjikayalu into the oil slowly and deep-fry them till golden brown, turning them carefully to the other side so that it cooks on all sides.
- Remove and cool them.
- Repeat the process & fry all the kajjikayalu.
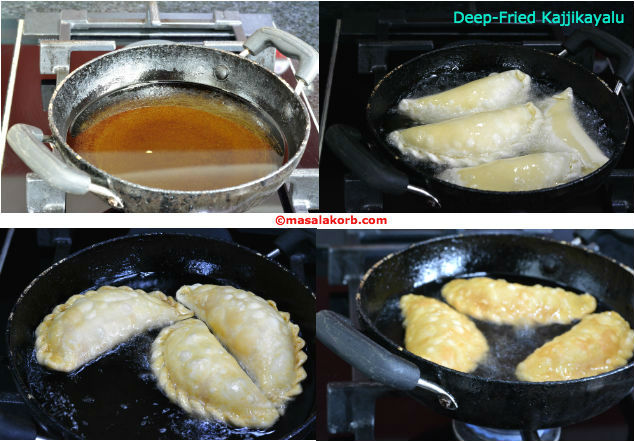
- Once they cool down, store in an airtight container.
- Kajjikayalu can be stored for 3-4 weeks, though nothing can beat the taste when had them fresh.
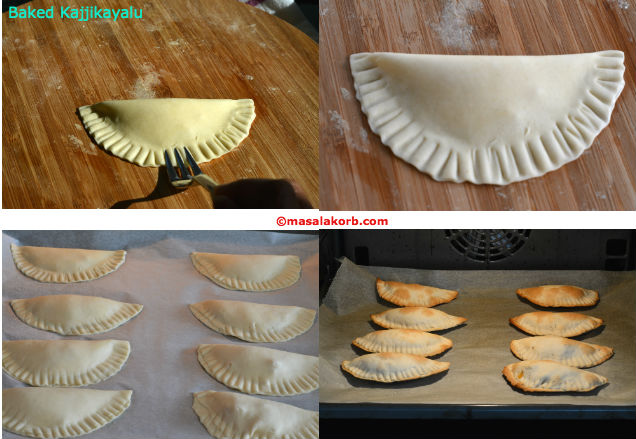
5. Baking method:
- The dough is prepared in the similar way except the inclusion of an extra ingredient while kneading, which is ¼ teaspoon of baking powder. All the other ingredients for the dough mix remain the same.
- Filling remains the same.
- I chose a different closing method for baked version so that the edges are not thick and gets cooked evenly. For this once your close, press with a fork around the edge. This method may be risky for deep-fry method as there is a chance for the filling might come out while frying.
- Spread a baking sheet on a baking tray and arrange kajjikayalu as shown below.
- Preheat oven. Put the baking tray into the oven and bake at 200 degrees celsius for 15 to 18 minutes turning sides half way through. Allow to brown evenly on both the sides.
Comparison between deep fried and baked Kajjikayalu:
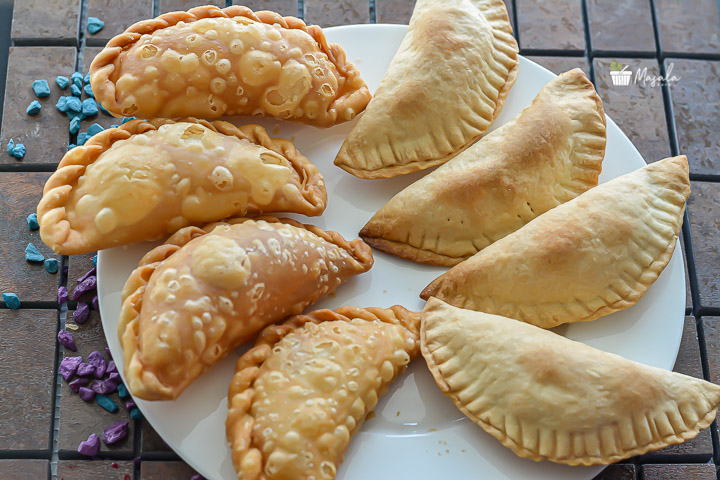
You can compare and see the difference yourself;-)…In the above picture, on the left you can see the deep fried version and on the right you have the baked version…..Let me put my views:
- Both the versions tasted equally good, which I definitely did not expect.
- There is some colour difference in the appearance, it is not evenly golden brown in the baked version.
- In both versions the exterior was crispy and did not become hard even after a day.
- This is my first try with the baked version and now I have decided to mostly bake kajjikayalu in future, so that I can have it guilt free.
What do you think?…Do let me know through your comments!! Hope you liked Kajjikayalu Traditional and Baked Versions!!

Kajjikayalu Traditional and Baked Versions - Gujiya Recipe
Ingredients
For the dough:
- 2 Cups All Purpose Flour Maida
- 1 inch cube butter
- A pinch of salt
- Required water to knead the dough
- ¼ tsp baking powder Only for baked version
For Sugar Filling:
- 1 Cup Semolina dry roasted till fragrant
- 1 to 1 ½ Cup Desiccated Coconut
- 1 to 1 ½ Cup Sugar
- 1 Cup Roasted Chickpeas Putnala pappu or (Pottu kadalai), grind to a coarse powder
- 2 tbsp Poppy Seeds dry roasted
- 1 tsp Cardamom powder
- ½ Cup Cashews Chopped
- ¼ Cup Raisins
For jaggery filling:
- 1 to 1½ Cup Jaggery Replaces sugar
- Rest of the ingredients same as for sugar filling
Other Ingredients:
- Required oil for deep frying
Instructions
For the dough:
- Mix flour with a pinch of salt, butter and enough water to make a pliable dough. The dough shouldn’t be too soft. Set aside covered for half an hour. Note: No baking powder is required for the deep fried version.
- In the mean time prepare the filling.
For the filling:
- In case of jaggery filling replace sugar with 1 to 1½ cup jiggery or combine both sugar and jiggery in the ratio 1:1.
Preparing kajjikayalu:
- Divide the dough set aside and shape into small balls.
- Roll each ball with the rolling pin into a thin circular poori.
- Spread a tablespoon of the filling on one half of the rolled out dough.
- Wet your finger with water and run it along the circumference of the spread out dough.
- Fold over to the opposite end, enclosing the stuffing to form a semi-circle. Press the ends firmly so that the filling doesn’t come out during the deep-frying process and twist the edges around the kajjikaya.
Deep-frying method:
- Heat enough oil in a wide pan over medium low heat to deep fry kajjikayalu.
- Drop 3-4 kajjikayalu into the oil slowly and deep-fry them till golden brown, turning them carefully to the other side so that it cooks on all sides.
- Remove and cool them.
- Repeat process till all the kajjikayalu are completely done frying.
Baking method:
- Include ¼ teaspoon of baking powder while kneading the dough in case of baking.
- The filling and rest of the process remains the same. I adopted another version to close the kajjikayalu to ensure even cooking.
- Preheat oven and bake kajjikayalu at 200 degree Celsius for 15 to 18 minutes turning sides half way through.
- Once they are cooled down, store in an airtight container. Kajjikayalu can be stored for 3-4 weeks, though nothing can beat the taste when had them fresh.
Recipe Video
Notes
- Ensure to fry over medium low heat, turning them over a few times, till the bubbles in the oil subside completely. This way the kajjikayalu become crisp.
- If you fry them on high heat, they will become soft like pooris. So frying them is time taking and you need to be patient. Each lot of frying will take around 10 to 12 minutes.
- Adjust sugar or jaggery to suit your taste.
- It is better to roll out and prepare a few kajjikayalu before starting to fry the first lot.
- Give some time for the kajjikayalu to dry out after rolling and before frying them. This way they are firm while adding into the oil and get a crisp texture.
- Kajjikaayalu moulds (available in the market) can be used to shape the kajjikayalu after rolling out dough.
- You can also include roasted and powdered sesame seeds or khoya can be used with a blend of cashews, walnuts and almonds.
- The best part of the recipe is you have total control over the filling to include and exclude any ingredient.
You might want to check out other popular desserts from my blog- Carrot halwa, coconut burfi. rice kheer, sweet pongal, beetroot halwa, bread rasmalai…..and many more to come. Stay tuned!!
Check out other similar categories from blog:
And many more to come!!…..Stay Tuned!!
Hungry for more? Never miss a recipe!!…Subscribe to MasalaKorb and have posts delivered straight to your inbox! And connect with me on Facebook, Google, Twitter, Instagram and Pinterest for all of the latest updates.
Do subscribe to my YouTube Channel for latest video alerts!!
Did you make a recipe? Make sure to tag your photo with this hashtag: #masalakorb
Happy Cooking ![]()
Cheers!!
Padma.
