• Skip to primary navigation
  • Skip to main content
  • Skip to primary sidebar
  • Skip to footer

Masalakorb

  • Home
  • Recipes
    • Breakfast Recipes
    • Quick Bites
    • Indian Vegetarian Recipes
      • Indian Chutneys and Raitas
      • Sambar Varieties
      • Lentils/Dal Recipes
      • Rasam Varieties
      • Paneer Recipes
      • Vegetable dry curries
      • Vegetable gravies
    • Indian Non Vegetarian Recipes
      • Chicken Recipes
      • Egg Recipes
      • Seafood recipes
    • Indian Rice Recipes
    • Indian Breads
    • Indian Chaat Recipes
    • Festival Recipes
    • Regional Indian Cuisine
    • Baking Recipes
    • Desserts
  • Basics
  • Recipe Index
  • About
  • Contact
  • Navigation Menu: Social Icons

    • Facebook
    • Instagram
    • Pinterest
    • Twitter
    • YouTube
  • Video Recipes
  • Privacy Policy
Home » Indian Breads » Eggless Ladi Pav Bread Buns Recipe | Mumbai Pav Recipe | How to make soft bun bread at home | Eggless Dinner Rolls Recipe

Eggless Ladi Pav Bread Buns Recipe | Mumbai Pav Recipe | How to make soft bun bread at home | Eggless Dinner Rolls Recipe

February 24, 2021 by Padma Veeranki 74 Comments

Jump to Recipe Jump to Video Print Recipe

Eggless Ladi Pav Bread Buns Recipe | Mumbai Pav Recipe | How to make soft bun bread at home | Eggless Dinner Rolls Recipe – Make eggless, light, fluffy & Soft Pav Bread at home with all tips & tricks. Nothing can beat freshly made homemade ladi pav & once you start making your own pavs, you will stop buying buns from the market.

Editor’s note: This post was originally published in September 2016 and has been updated with few edited pictures & Video for comprehensiveness and freshness. 
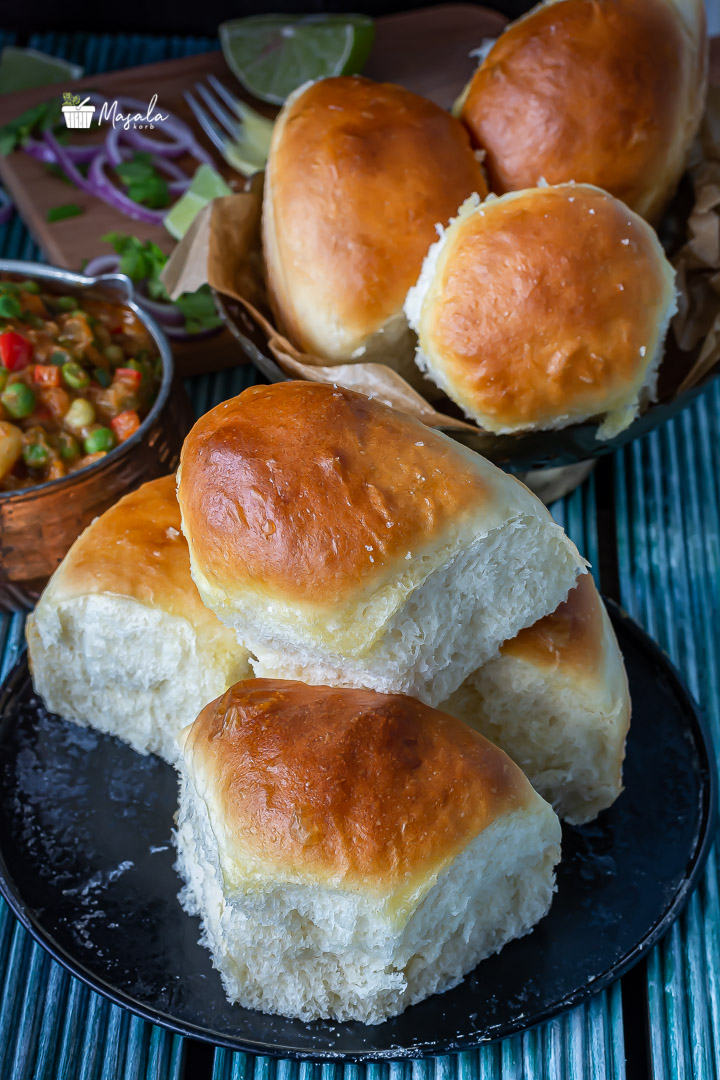
Eggless Ladi Pav Bread Buns Recipe Mumbai Pav I’m here today to share Eggless Ladi Pav Bread Buns Recipe, the very famous and an all time favourite street food of everyone. They are so easy to make, very light and fluffy, which makes them very hard to resist. Of course, nothing can beat freshly made homemade ladi pav and once you start making your own pavs, you will stop buying market buns.

When we moved to Germany, Pav Bhaji was one of our favourite weekend party snacks. So, we were always on the look out for good substitute for Pav bread. We tried so many varieties and kinds of dinner rolls and buns, but none of them would go well with Indian Bhaji.  There are tons of Pav making recipes online. I’m sure each one has its own uniqueness. So, with many trial and errors, I finally have one that I’m happy with (I make this for the past 10 years). It’s a combination recipes, so I cannot to refer to one particular recipe. I will still continue to experiment and update you when I come up with something different.
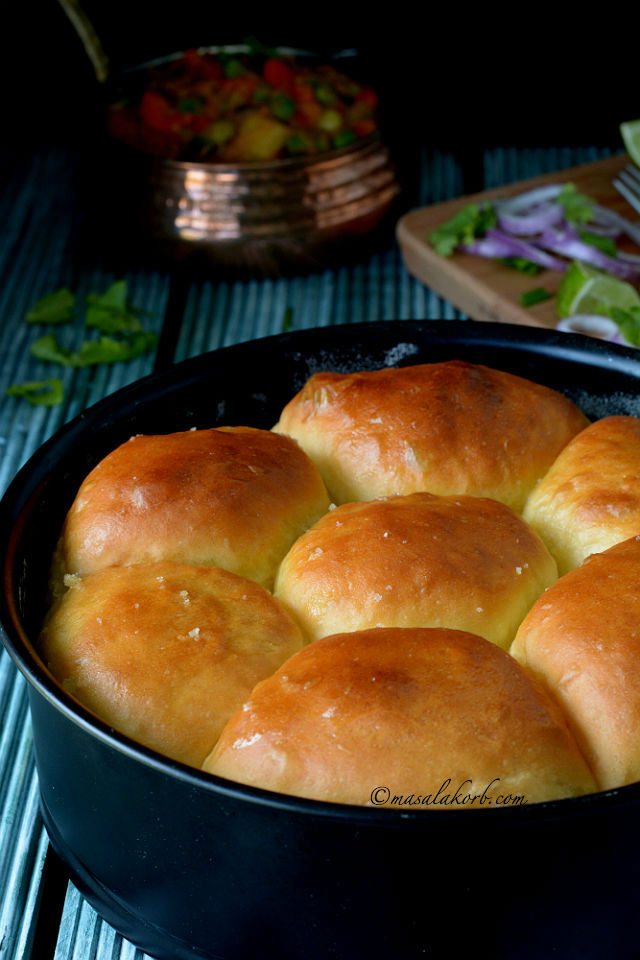
Eggless Ladi Pav Bread Buns Recipe Mumbai Pav

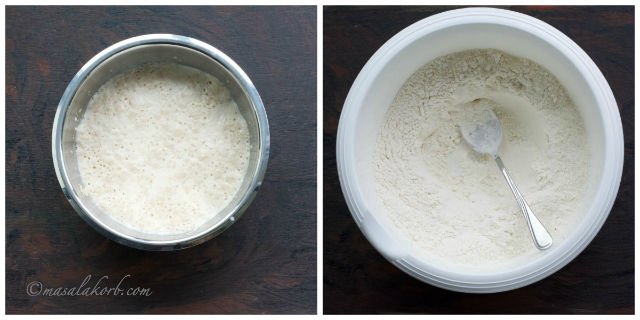
First step for Eggless Ladi Pav Bread Buns Recipe would be to proof the yeast with warm milk or water and sugar. Before adding yeast to the dough, let it stand for 15 minutes till it becomes thick, frothy and bubbly. This proofing procedure indicates that yeast is alive and active. If yeast fails this step, please discard and start all over again. Do not proceed with the recipe. 

The precautions to keep in mind for light fluffy Pavs:

  • Well proofed yeast.
  • Dough should double or triple in size.
  • Second rise of the dough rolls is also equally important.
  • Applying butter after removing pavs from oven so that the top part will become soft.

If you follow these, I don’t think you can go wrong to get these feather light Pav buns.

Off to Eggless Ladi Pav Bread Buns Recipe!!
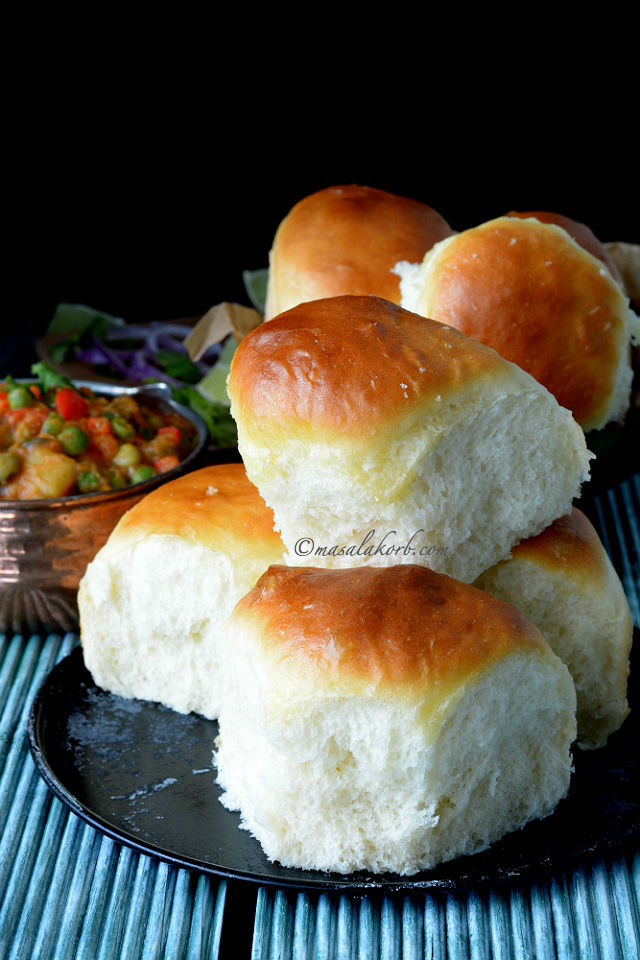
Eggless Ladi Pav Bread Buns Recipe Mumbai Pav

Step by Step process for

Eggless Ladi Pav Bread Buns Recipe:

Proofing yeast:

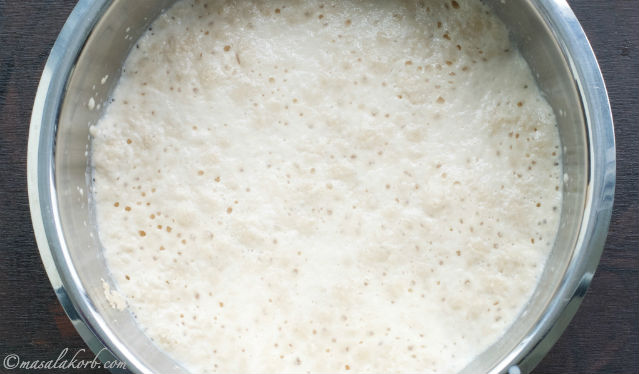
  • The first step is to proof the yeast. For this warm (lukewarm) milk in a bowl, add sugar and then yeast. Mix well and keep in a warm place for 10 to 15 minutes till it becomes thick and frothy (Picture below). If your yeast fails this step please discard and repeat proofing process. Proceed with this step only if you are using active dry yeast. Skip this step in case you are using instant yeast.
Eggless Ladi Pav Bread Buns Recipe Mumbai Pav

Preparing the dough for Ladi Pav:

To make the dough, you will need:

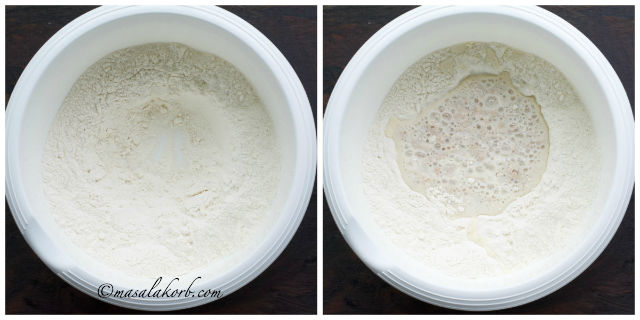
  • Proofed yeast and all purpose flour

Eggless Ladi Pav Bread Buns Recipe Mumbai Pav

  • In a bowl add all purpose flour and a little salt.
  • Mix and make a well in the centre of the flour.
  • Add the yeast mixture to the well.

Eggless Ladi Pav Bread Buns Recipe Mumbai Pav

Kneading the dough:

  • Use your hands or dough maker to knead to a soft pliable dough. It would be slightly sticky but that’s absolutely fine.
  • Lightly dust your clean kitchen counter and transfer the dough.
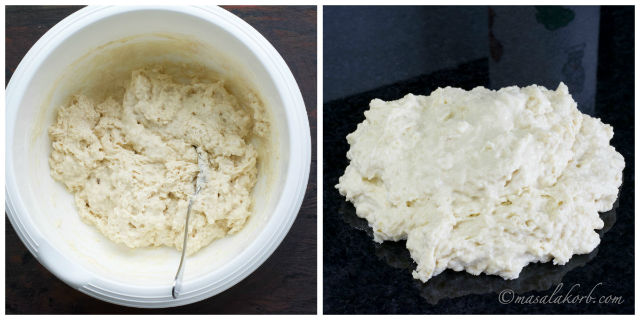
Eggless Ladi Pav Bread Buns Recipe Mumbai Pav

  • Add butter (or Oil) and knead it for 12 to 15 minutes. 
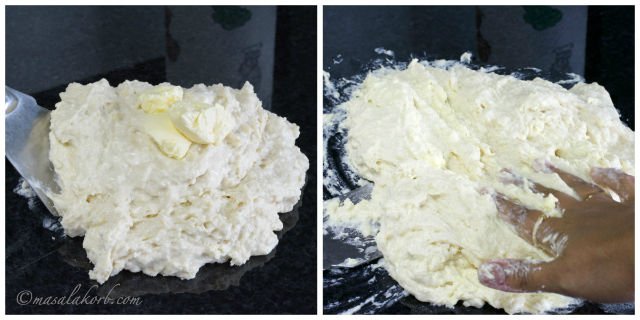
Eggless Ladi Pav Bread Buns Recipe Mumbai Pav

  • Use a scraper or a ladle to scrape out the dough stuck to the counter while kneading.
  • Kneading is the most important stage to develop gluten, and make the dough elastic.
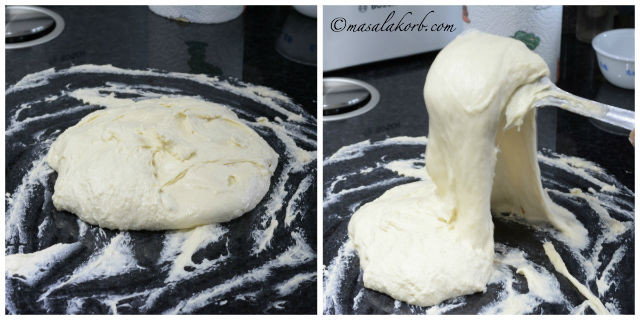
Eggless Ladi Pav Bread Buns Recipe Mumbai Pav

First rise of the dough: First Proofing

  • Now transfer the dough to a big bowl, cover and keep aside in a warm place about one hour (or more depending on your climatic conditions).
  • The dough will rise and double or even triple in volume.
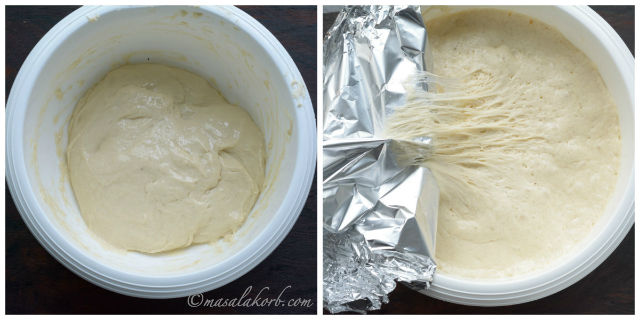
Eggless Ladi Pav Bread Buns Recipe Mumbai Pav

  • Once the dough has risen, remove it from the bowl and knead it for another 2-3 minutes. This step is important for lighter pavs. Dough elasticity and gluten formation is enhanced by kneading. If it’s too sticky, add a little flour and knead. But don’t add too much flour, otherwise the pav will not be that soft.
  • Now divide this dough to equal portions (around 30 to 35 grams each). Now keep one portion in your palm and with other hand roll this in circular motion to make a round shape. You get 10 to 12 medium sized pavs. But all this again depend of how much your dough has risen and how airy it is.
  • Grease a cake tin with oil and place the shaped dough balls. Keep the dough portions very close touching each other. If there is space, they will rise sideways and not up.
  • Now cover the tin with damp cloth or a plastic wrap and keep aside for another half an hour (or a little more) till they rise.
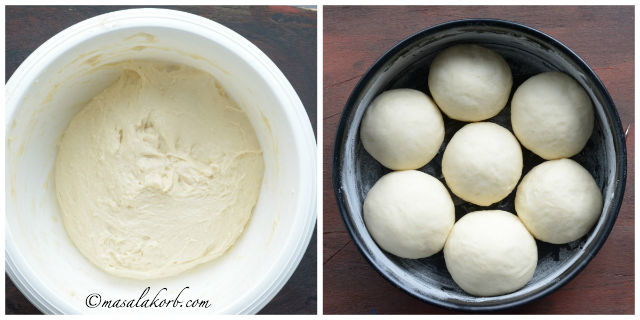
Eggless Ladi Pav Bread Buns Recipe Mumbai Pav

Second rise of the dough (pavs): Second Proofing

  • Remove the damp cloth after 30 minutes, you will see that the pavs have risen.
  • Brush the pavs with milk to get a nice brown colour when you bake them.
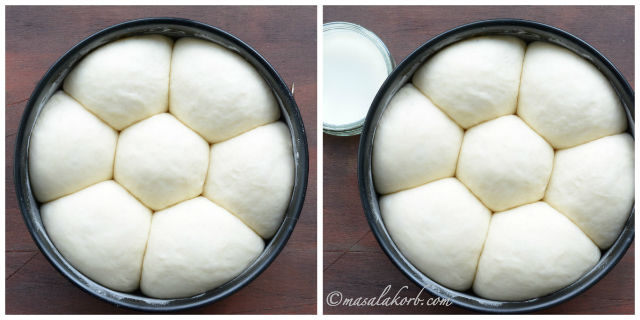
Eggless Ladi Pav Bread Buns Recipe Mumbai Pav

Baking Pav:

  • Preheat your oven to 200°C.
  • Place the cake tin in the oven and bake pavs for 16 to 20 minutes or till done. The pavs should evenly brown from top.
  • If you don’t get a brown colour, bake for some more time.
  • If you prefer a little darker colour, place them closer to the heating element for few seconds until the top gets darker.
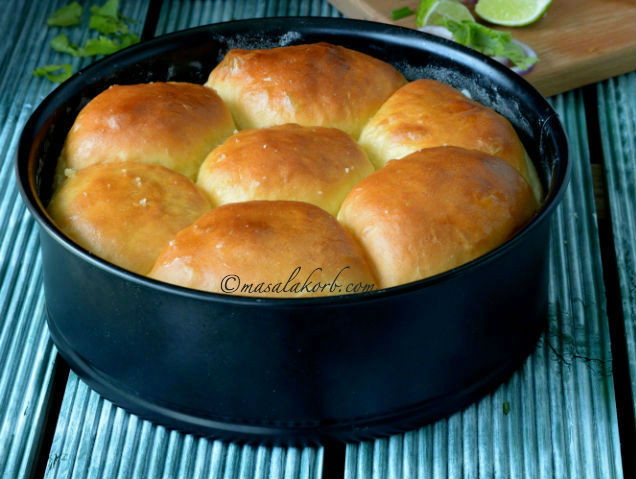
Eggless Ladi Pav Bread Buns Recipe Mumbai Pav

  • Turn off the oven and remove the pavs. Initially they will look dry.
  • Take them out and immediately brush the top part of the pavs with butter, so that they are soft and do not dry out.
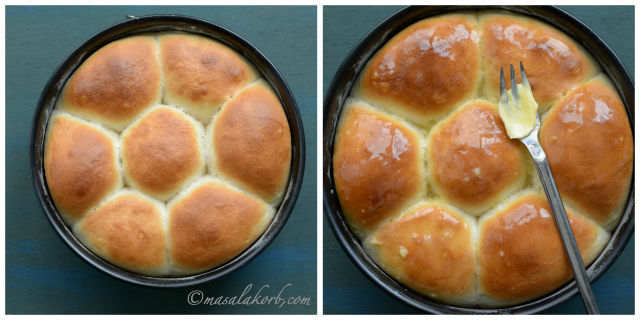
Eggless Ladi Pav Bread Buns Recipe Mumbai Pav

  • Take a spatula and run it around the edges of the tin to loosen it from the sides to remove the pavs. You can just easily pull apart and separate the pavs.
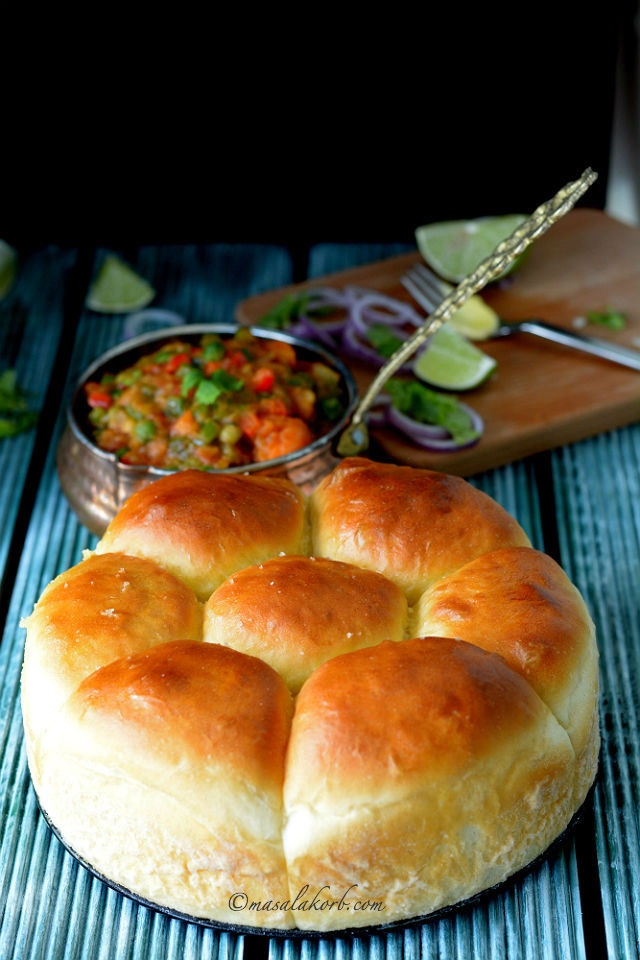
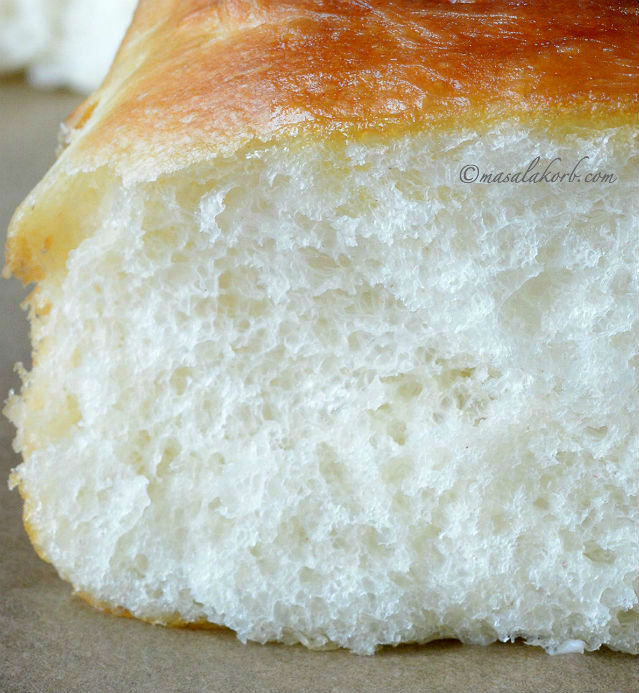
Eggless Ladi Pav Bread Buns Recipe Mumbai Pav

Eggless Ladi Pav Bread Buns Recipe Mumbai Pav

  • Keep aside on a wire rack down till they cool down and then ENJOY with bhaji.!!
  • You can also serve with wada pav or missal pav.
  • Store pavs in a zip lock bag or airtight box to prevent them from drying. They are good to go for 2 to 3 days. You can also refrigerate them for a week or more.
  • Hope you enjoyed my version of Eggless Ladi Pav Bread Buns Recipe!! Let me know in the comment how you make your pavs 🙂
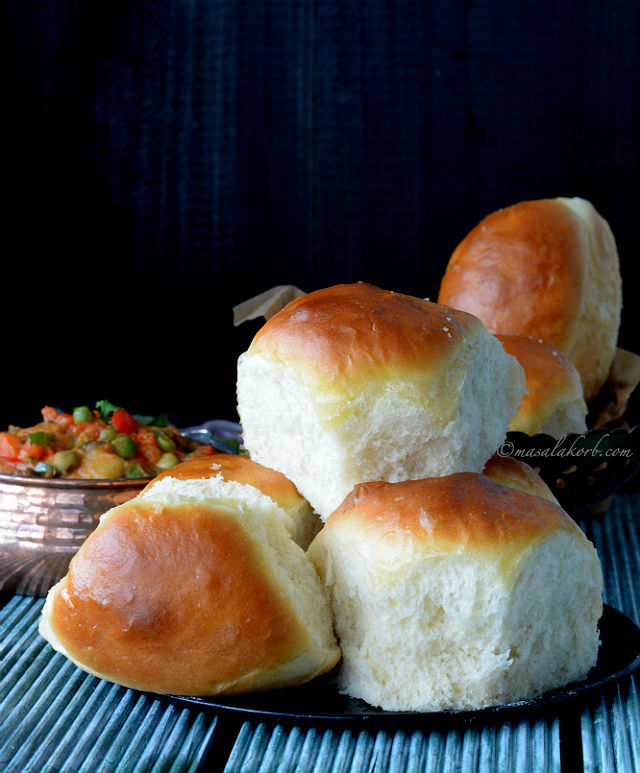
Eggless Ladi Pav Bread Buns Recipe Mumbai Pav

Eggless Ladi Pav Bread Buns Recipe Mumbai Pav
Print Recipe

Eggless Ladi Pav Bread Buns Recipe | Mumbai Pav | Eggless Dinner Rolls Recipe | How to make soft bun bread at home

Step by step guide for Eggless Ladi Pav Bread Buns Recipe to make soft, light & fluffy Mumbai Pavs at home.
Prep Time2 hours hrs
Cook Time20 minutes mins
Total Time2 hours hrs 20 minutes mins
Course: Appetizer/Maincourse, Breakfast / Lunch / Dinner, Snacks (Street Food)
Cuisine: Indian (Maharashtrian)
Servings: 5
Author: Padma Veeranki

Ingredients

For Proofing Yeast:

  • 3/4 Cup milk
  • 1 tbsp Sugar
  • 1.5 tsp Active Dry Yeast

For the Dough:

  • 2 Cups All Purpose flour
  • 3/4 tsp Salt
  • 1 tbsp Milk Powder Optional
  • Proofed Yeast Liquid
  • 2 tbsp Butter or Oil
  • Extra flour for kneading the dough

Other Ingredients:

  • Extra Butter and flour for greasing and dusting the pan
  • Milk and butter for brushing pavs

Instructions

  • Proofing yeast:
  • Warm milk in a bowl, add sugar and then yeast. Mix well and keep in a warm place for 10 to 15 minutes till it becomes frothy.
  • Preparing the dough:
  • In a bowl add flour and salt. Mix and make a well in the centre and add the yeast mixture. Knead to a soft pliable dough adding the butter. Knead for at least 10 too 15 minutes. Watch video for reference.
  • Transfer the dough to a big bowl, cover and keep aside in a warm place about one hour.
  • The dough will rise and double in volume.
  • Knead for another 2-3 minutes adding a little flour, if it’s too sticky.
  • Divide dough to equal portions and make a round shape.
  • Grease a cake tin and place the dough balls close to each other.
  • Now cover the tin and keep aside for half an hour till they rise.
  • Brush pavs with milk.
  • Baking Pavs:
  • Preheat your oven to 200°C and bake for 16 to 20 minutes or till done to get a brown colour.
  • Remove and brush top of pav with butter..

Recipe Video

Notes

  • Proofing yeast is very important. Very hot milk or water will kill yeast and cold milk or water will not activate yeast. So the temperature should be warm (lukewarm).
  • Don’t bring salt in direct contact with yeast, it will not proof properly.
  • Including milk powder in the flour to give a slightly sweeter taste to the pavs is optional.
  • A large, smooth work surface is necessary for kneading dough. Make sure that the work surface is clean before kneading the dough.
  • Kneading is the key to perfect pavs. Kneading develops gluten and makes the dough soft and elastic. You can also use a food processor with dough making blade to knead the dough. If you do not knead properly,, gluten will not be formed & pav turns crumbly.
  • If you add too much flour while kneading, pav turns dry.
  • Place dough in fridge for overnight proofing. If you want to make the next day.
  • Always keep the dough covered to prevent from drying.
  • Tightly roll the dough for perfect shape.
  • Place the pass close to each other so that they stick to each other after second proofing & this way the edges will not dry out & you get soft pavs.
  • Give a milk wash for egg wash for that golden coloured pavs.
  • Preheat oven to the required temperature before placing the tray into the oven.
  • If you over bake, it will result in harder pavs.
  • Once pav is out of the oven, remove them from the baking tray and allow them to cool down on a wire rack. If allowed to sit too long in the baking tray they will turn moist at the base due to heat condensation and you will get soggy pavs.
  • When you first remove the pav from the oven they might feel hard on the top. They will be super soft as they cool down. Also brushing the top with butter softens the pavs.
  • You can also use whole wheat flour to make pavs. All purpose flour has more gluten compared to wheat flour. So pavs made with all purpose flour are softer and fluffier compared to whole wheat.
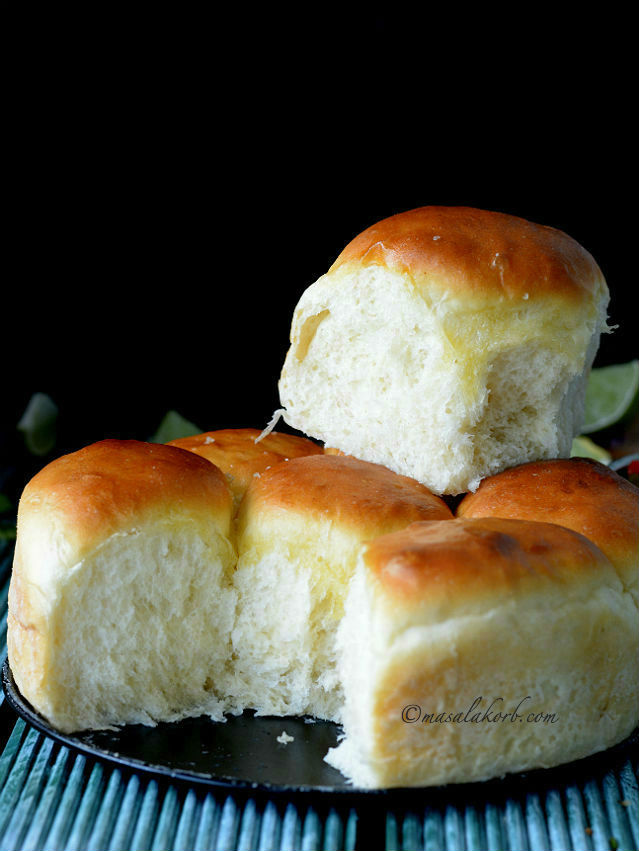
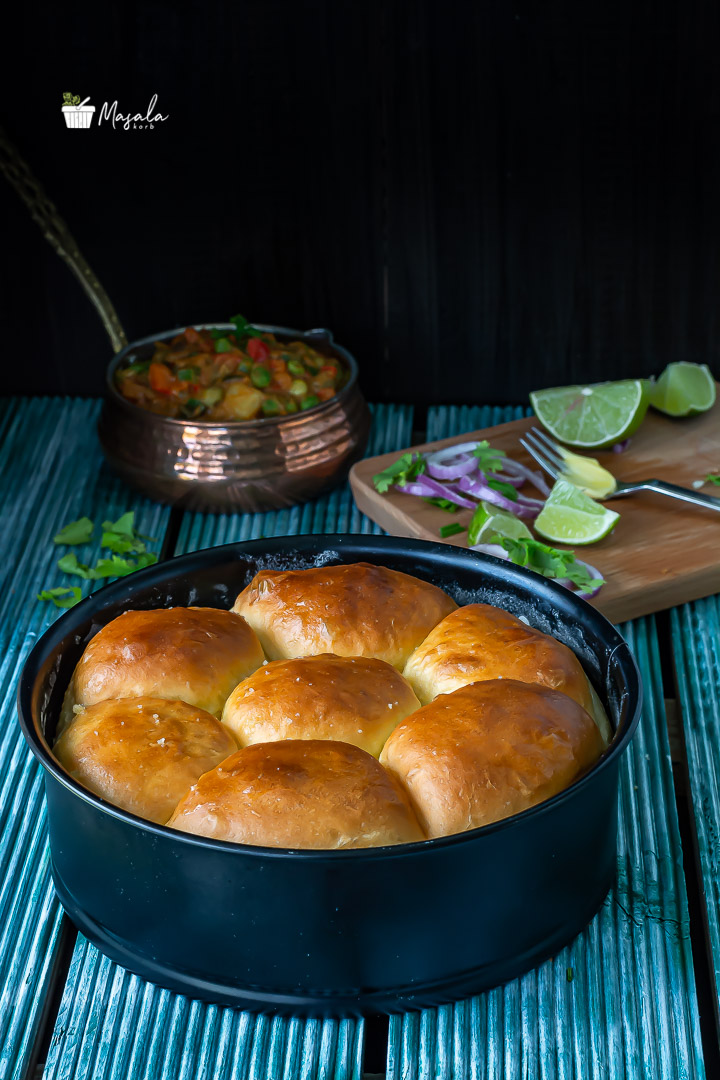
Eggless Ladi Pav Bread Buns Recipe Mumbai Pav

Freshly baked pav out of the oven.

CHECK OUT OTHER BAKING RECIPES FROM BLOG:

And many more to come!!…..Stay Tuned!!

Hungry for more? Never miss a recipe!!…Subscribe to MasalaKorb and have posts delivered straight to your inbox! And connect with me on Facebook, Google, Twitter, Instagram and Pinterest  for all of the latest updates.

Do subscribe to my YouTube Channel  for latest video alerts!! 

Did you make a recipe? Make sure to tag your photo with this hashtag:  #masalakorb

Happy Cooking ????

Cheers!!

Padma.

Receive Updates

No spam guarantee.

I agree to have my personal information transfered to MailChimp ( more information )
Thank you for subscribing.
Something went wrong.

Sharing is caring!

1.2K shares
  • Share
  • Tweet

Filed Under: All Categories, Baking Recipes, Blog Hop, Breakfast Recipes, Christmas Indian Recipes, Indian Breads, Maharashtrian Cuisine, Recipes, Regional Indian Cuisine Tagged With: all purpose flour, Bread, bread rolls, bun, dinner rolls, laadi pav, ladi pav, Milk, Mumbai pav, pav, pav bhaji, pav buns, soft bun, street food of India, yeast

Previous Post: « Pav Bhaji Masala Powder Recipe | How to make Pav Bhaji Masala at Home | Mumbai Pav Bhaji Masala Powder Recipe
Next Post: Pav Bhaji Recipe Instant Pot | Mumbai Pav Bhaji Recipe | Easy Instant Pot Pav Bhaji – Spiced Mashed Vegetables »

Reader Interactions

Comments

  1. P

    May 28, 2021 at 3:18 am

    5 stars
    Hello,
    First off I love this pav recipe thank you for sharing it. You mentioned putting the dough in the fridge overnight and making it in the morning.
    Could you elaborate on that please?
    Do you put the dough in the fridge after the first rise or after giving them their pav shape?
    If I put the dough in the fridge in late afternoon/ early evening and take it out early morning the next day would that be fine?
    And how long before I wanna make the pav should I take the dough out of the fridge? Thank you.

    Reply
    • Padma Veeranki

      May 30, 2021 at 12:04 am

      First of all thank you so much & glad you liked my pav recipe! If you do not plan to make pav same day, you can leave it in the fridge for overnight proofing, as it will be cold in the fridge and the dough slowly ferments, so will take longer and you can make it next day!…this is meant for the first proofing!..around 8 hours should be fine! you can leave on the counter for about an half hour before you want to make!..just to bring it to room temp!…hope i answered all your queries!

      Reply
      • B

        July 16, 2023 at 9:59 pm

        Can you proof the dough overnight after you shape the pav? Or can it only be done for the first bulk rise?

        Reply
  2. Ratna manikyam Atloori

    May 5, 2020 at 4:50 pm

    5 stars
    Tried today first time baking Pav following your recipe. Turned out good.

    Reply
    • Padma Veeranki

      May 7, 2020 at 9:28 am

      Thank you for the feedback 😊

      Reply
  3. Neelam

    April 16, 2020 at 4:08 pm

    Thanks for the sharing the wonderful detailed receipe… I tried it.. they looked perfect

    Reply
  4. Monika

    April 11, 2020 at 5:02 pm

    It came out awesome ????… it’s yummy

    Reply
  5. Tarana

    July 24, 2019 at 11:12 am

    Hi, I’ve made this recipe twice and its come put perfect both times. Not as perfect as yours but I’m happy with the result. In the rare event that some get left over for the next day, it becomes really hard until heated. Any tips on how to keep.it soft for a couple of days?

    Reply
  6. Seema

    September 13, 2018 at 11:22 am

    4 stars
    Hi Padma
    I’ve been planning to try dinner rolls for a long time. Just tried your recipe today and it turned out awesome. My kids gobbled up 2 each fresh from the oven :). Some of the rolls became too brown on the top (I got 9 of them by the way). So will have to adjust the temp next time. Thank you so much for this wonderful recipe. You made my day !!!

    Reply
    • Padma Veeranki

      September 27, 2018 at 2:22 pm

      Thank you for your feedback…Glad your family liked it 🙂

      Reply
  7. Vijatha Arun

    June 4, 2018 at 5:58 pm

    5 stars
    Tried n its just amazing.. now no more street pav-bhaji, only home made pav- bhaji.

    Reply
    • Padma Veeranki

      June 5, 2018 at 10:47 am

      Thank you for your feedback…glad you liked it 🙂

      Reply
  8. Life_rockss

    February 2, 2018 at 8:44 pm

    5 stars
    Hi Padma,

    those pavs look lovely, I tried the similar recipes many times but always had two problems, 1) they look brown and not white (I use all purpose flour and not wheat flour)
    2) They are bit soggy and heavy rather than fluffy and light.

    any idea what must be wrong in my process?

    Reply
  9. Minal Kamat

    November 10, 2017 at 1:39 pm

    Hi.. tempting recipe ????
    Just want to know one thing… Which active dry yeast can be used? I used eagle’s active dry yeast . As per your procedure I had mixed yeast in warm milk but it doesn’t proofed. Let me know what’s wrong.

    Reply
    • Padma Veeranki

      November 10, 2017 at 2:07 pm

      I don’t live in India, so haven’t tried any brand. This is the info I got from my friend….”The yeast available in the form of large granules in India, examples are Eagle, Kwality and a lot of other brands. This kind of yeast needs to be dissolved in warm water and sugar for the yeast to be active again, this is called as proofing. Proofing is a test done to make sure the yeast is still active and good. If the yeast, fails this test, please discard and get some good yeast. She said that her experience has been really bad with these brands as even the ones manufactured a couple of months earlier don’t proof.” That could be the reason…you also mentioned you added to warm milk, but, did u add sugar?….Hope this helps!!

      Reply
  10. Balapriya

    October 7, 2017 at 3:53 pm

    Hi dear looks yummy. Want to try. 2 cups means how much in grams or ml cup? Pls let me know.

    Reply
    • Padma Veeranki

      October 8, 2017 at 10:11 am

      Hi….All measurements are in grams cup…hope this helps..Thank you 🙂

      Reply
      • Balapriya

        October 8, 2017 at 10:16 pm

        I have 250ml cups. One cup means how much grams it will come. Sorry to trouble you.

        Reply
        • Padma Veeranki

          October 9, 2017 at 1:08 am

          No problem at all Balapriya…..A 250 ml cup holds approximately 125 grams of flour by weight…As long as you use the same cup for measuring out each of your ingredients, the proportions should work out the same.

          Reply
  11. Dhruti

    September 16, 2017 at 5:18 pm

    Hi Padmaji,

    Good morning,

    You did not say anything about rapiderise yeast. How to use it.
    Thanks.

    Reply
  12. Rachana V

    June 14, 2017 at 12:43 pm

    Wow…… it has come out very well.
    Thank you very much for sharing the receipe.

    Can you please share some more bakery and bread receipes ?

    Reply
  13. Meghana

    October 6, 2016 at 8:11 pm

    Lady I have tried making Pav in the past and failed, miserably! ????
    If there’s ever a mumbaiite who loves her pav it’s me! But thank you so so so much for this – this wonderful simple recipe has fulfilled the abyss (of missing Them in US) and given me yummy soft beautifully light brown looking pavs that’s now going into my permanent recipe bookmark for pav! ????????

    Thank you soooo much Padma!

    Reply
    • Padma Veeranki

      October 13, 2016 at 2:00 pm

      Hi Meghana…Thank you so much for the lovely feedback..you made my day..glad to hear that you loved the recipe 🙂

      Reply
  14. Megha

    September 26, 2016 at 8:00 am

    Hello Padma

    I tried to bake as per your recipient for my 3 year old who is very fond of buns.
    Everything went OK until I realised that the bottom part isn’t baked quite well. Appeared very raw although the top crust was nice and brown. Please help as to what went wrong!! The buns are baked till the top half but the bottom is raw and moist. 200 degress for 20 min is what I baked them for. HELP !!:(

    Reply
    • Padma Veeranki

      September 26, 2016 at 10:45 am

      Hi Megha…Thank you for trying my recipe!! Possibilities I can think of 1.may be sizes of the bun were big 2.You must have placed the tray very close to the heating element, that the upper part got cooked very fast or finally what I can think of…3.did you check which mode your oven was…it should be the one which has top and bottom heating..like 2 parallel lines…..Hope this helps!!

      Reply
    • Marlana

      February 25, 2018 at 5:15 am

      5 stars
      Maybe you used 200 degrees Fahrenheit instead of 200 degrees centigrade! There is a huge difference. In Canada we use Fahrenheit, in Europe we use Centigrade. 200 degrees Fahrenheit will not bake your pavs. You need about 380 degrees Fahrenheit.

      Reply
      • Padma Veeranki

        February 25, 2018 at 7:34 pm

        Hi….You are totally correct!!…You need to check the conversion from Celsius to Fahrenheit…so 200 centigrade equals to 392F….I have mentioned in 200 Centigrade and not Fahrenheit in the recipe….Hope this helps…Happy baking…Thank you 🙂

        Reply
  15. mahek

    September 20, 2016 at 9:04 am

    5 stars
    Hi
    I discovered your blog today… wonderful I will be adding you to my side bar.
    This recipe seems to be wonderful… which yeast do I use here in India , I want to give this recipe a try.

    Reply
    • Padma Veeranki

      September 20, 2016 at 4:44 pm

      Thank you so much for visiting my space!! I live out of India..but I heard the yeast from prestige brand is good..may be you can give it a shot!!!

      Reply
  16. Priya santhamohan

    September 19, 2016 at 1:12 pm

    Priya @asmallbite
    First time to your space,pav buns looks soooo soft and well explained.Nice clicks too.

    Reply
    • Padma Veeranki

      September 20, 2016 at 4:45 pm

      Thank you so much priya for visiting my space…will definitely hop on to your blog right away!!

      Reply
  17. beena

    September 18, 2016 at 7:12 pm

    Perfect pav buns. Love it

    Reply
    • Padma Veeranki

      September 18, 2016 at 9:45 pm

      Many thanks beena 🙂

      Reply
  18. Mrs Sridevi Srinath

    September 18, 2016 at 4:00 pm

    4 stars
    It’s a long process and if something go wrong all ingridients will waste.yes or no.but really buns are looking fresh and hygienic .

    Reply
    • Padma Veeranki

      September 18, 2016 at 4:17 pm

      Hi Sridevi….First of all Thank you!!..As long as you follow the recipe, chances are less to go wrong. The ingredients will definitely not go waste… but you may not get soft and fluffy buns when not done properly..they will still be edible when completely baked!!…Hope this helps!!

      Reply
  19. Rubeena

    September 16, 2016 at 8:22 pm

    5 stars
    Wow nice padma. I need to try. Thanks.

    Reply
    • Padma Veeranki

      September 17, 2016 at 11:24 am

      Sure dear…do give it a shot..Thanks!!

      Reply
  20. Anu

    September 16, 2016 at 4:22 pm

    Good one!!

    Reply
    • Padma Veeranki

      September 17, 2016 at 11:23 am

      Thanks!!

      Reply
  21. Sundari

    September 16, 2016 at 10:39 am

    wow!! super soft and spongy buns!! Just take my eyes off the pics!!

    Reply
    • Padma Veeranki

      September 17, 2016 at 11:23 am

      Thank you sundari 🙂

      Reply
  22. parvathy

    September 15, 2016 at 2:24 pm

    wow wow , look at those crumb shots . I can see the air pockets there and it makes me drool so much . Love the recipe and I am so going to try this . I have bookmarked it Padma , wonderful pictures as well

    Reply
    • Padma Veeranki

      September 17, 2016 at 11:23 am

      Thanks paro…do try it 🙂

      Reply
  23. Rahat

    September 14, 2016 at 5:29 pm

    Hiii which brand yeast u had used ??

    Reply
    • Padma Veeranki

      September 15, 2016 at 1:01 am

      Hi!…I live in Germany…I use Dr.Oetkar…If you live in India, I heard Prestige brand is good..Hope this helps 🙂

      Reply
  24. Jayashree

    September 14, 2016 at 12:07 pm

    5 stars
    Lovely soft buns Padma…nicely presented

    Reply
    • Padma Veeranki

      September 14, 2016 at 4:30 pm

      Thanks Jaya 🙂

      Reply
  25. sarita

    September 13, 2016 at 8:31 pm

    Wow! Excellent recipe.

    Reply
    • Padma Veeranki

      September 14, 2016 at 4:32 pm

      Thank you sarita 🙂

      Reply
  26. Kriti

    September 13, 2016 at 4:26 pm

    5 stars
    Gorgeous beauty they are 🙂

    Reply
    • Padma Veeranki

      September 13, 2016 at 8:23 pm

      Thank you so much 🙂

      Reply
  27. Poornima Hegde

    September 13, 2016 at 3:09 pm

    Wow! The buns are gorgeous Padma!! Hats off to your patience.. they look literally feather soft.. Great recipe dear, looking forward to try it soon!

    Reply
    • Padma Veeranki

      September 13, 2016 at 8:24 pm

      Can’t wait to hear from you when you try it!!….Thanks a ton dear for your encouraging words 🙂

      Reply
  28. Prabhjot kaur

    September 13, 2016 at 2:40 am

    4 stars
    Hello
    Thank u for wonderful recepie . I tried today. Just final baking step is to be done. I got just 6 pav. Exactly followed ur recepie but don’t know why. What is measurement of 1 cup of maida ?

    Reply
    • Padma Veeranki

      September 13, 2016 at 1:22 pm

      Hi….First of all thank you so much for trying my recipe…1 cup is 128 grams of flour..May be the size of your pavs could be big…and also may be your kneading process was not sufficient enough to be airy enough…but hope the pavs turned out well…It took me a while for me too to master it…let me know if you have any question 🙂

      Reply
  29. Daisy Shroff

    September 13, 2016 at 12:44 am

    5 stars
    Hi. I want to make pavs for a small group party. How can I double or triple the recipe? Thanks.

    Reply
    • Padma Veeranki

      September 13, 2016 at 1:06 am

      Hi! First of all thank you so much to decide to prepare this for your party…You can easily double or triple the quantities proportionately as mentioned in the recipe…the only difficulty you might face is to knead the dough as this is a very crucial step to get soft pavs…So, you may have to work in batches, Hope this helps….Good luck!!

      Reply
      • Anita Wadher

        September 13, 2016 at 7:33 am

        5 stars
        Great .excellent recipe .

        Reply
        • Padma Veeranki

          September 13, 2016 at 1:17 pm

          Thank you 🙂

          Reply
  30. Manjusha Nair

    September 12, 2016 at 6:36 pm

    5 stars
    Awesome !!
    Would give it a try ..thanks for the details!!

    Reply
    • Padma Veeranki

      September 12, 2016 at 9:47 pm

      Thank you so much for visiting my space and leaving a comment…Hope you try it soon 🙂

      Reply
  31. Swati

    September 12, 2016 at 5:35 pm

    These are delectable Padma…Looks so fresh and delicious.I want to bake them ASAP. Wonderful pictures and very well explained recipe Padma..Thanks!

    Reply
    • Padma Veeranki

      September 12, 2016 at 9:48 pm

      Thanks a bunch swati for your kind words 🙂

      Reply
  32. seenasfoodbasket

    September 12, 2016 at 4:25 pm

    Padma, pav buns look soft and airy.. Can I take a couple of breads? =D

    Reply
    • Padma Veeranki

      September 12, 2016 at 9:49 pm

      Definitely dear…it’s all yours!!…Thanks dear 🙂

      Reply
  33. Sweta

    September 12, 2016 at 4:10 pm

    Can I use instant yeast??
    If yes then wht quantity??

    Reply
    • Padma Veeranki

      September 12, 2016 at 9:58 pm

      Hi sweta..my recipe calles for instant dry yeast…if using fresh yeast, you can use this link to convert..http://makebread.com.au/fresh-yeast-conversion/
      Hope this helps!!

      Reply
  34. Deepa - Veg Indian Cooking

    September 12, 2016 at 2:13 pm

    5 stars
    Wow! This pav is looking sooooo good and very perfectly made. Thanks for the wonderful share. Bookmarking..

    Reply
    • Padma Veeranki

      September 12, 2016 at 9:59 pm

      My pleasure Deepa…Thanks dear…Hope you try it!!

      Reply
      • P

        July 16, 2023 at 9:56 pm

        For the overnight proofing, do we proof the dough overnight for the first rise? Or do we do it for the second rise after theyve been shaped? And for overnight proofing do we let the process start for a little while (half an hour or fifteen minutes) befpre putting it in the fridge?

        Reply
  35. amrita

    September 12, 2016 at 1:50 pm

    wow…it has turned out awesome

    Reply
    • Padma Veeranki

      September 12, 2016 at 9:59 pm

      Thank you amrita 🙂

      Reply
  36. marudhuskitchen

    September 12, 2016 at 12:35 pm

    Airy..soft pav buns excellent procedure info
    ..yummy to the core

    Reply
    • Padma Veeranki

      September 12, 2016 at 9:59 pm

      Thank you Vani 🙂

      Reply

Leave a Reply Cancel reply

Your email address will not be published. Required fields are marked *

Recipe Rating


Primary Sidebar

Meet Padma

Padma Veeranki with her props and camera.

Recipes Straight to your inbox!!

Pick a Category

Monthly Archives

RECENT POSTS

Idli Milagai Podi Recipe | Mini Podi Idli | South Indian Gun Powder Recipe

Idli Milagai Podi, gun powder, idli podi

Tamarind rice or Puliyodharai Recipe | Tamilnadu Style Puliyodharai Recipe | Pulikachal Recipe

Ulli Theeyal Recipe Kerala Style | Onion Curry Kerala Style – Onam Sadya Recipe | Ulli Curry

Small onion curry served in a copper kadai.

Bitter Gourd Stir Fry or Kakarakaya Fry | How to make Bitter Gourd Fry Without Bitterness | Easy Karela Fry Recipe

Crispy Bitter gourd fry straight from pan.

Pappu Charu Andhra Style | How to make Pappu Charu in Cooker – Andhra Sambar Recipe | South Indian Lentil Soup

Pappu Charu Andhra Style
my foodgawker gallery
Indian Food Blogs
Badge for Top 30 Indian Food Photographers 2018
Privacy & Cookies: This site uses cookies. By continuing to use this website, you agree to their use.

To find out more, including how to control cookies, see here: Cookie Policy

Footer

Instagram

Instagram did not return a 200.

Follow Me!

Copyright © 2026 Masalakorb on the Foodie Pro Theme

1.2K shares