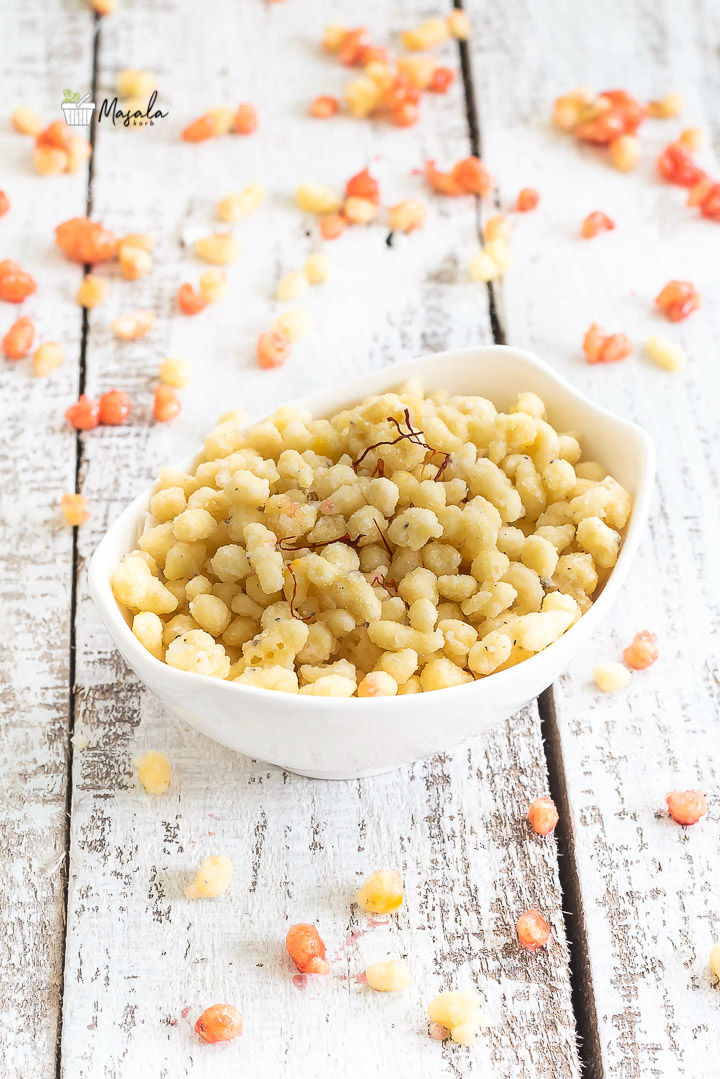
Sweet Boondi Recipe is pretty straightforward where tiny sweet round balls made of gram flour/besan are dipped in sugar syrup. This homemade Sweet Boondi or Meethi Boondi Recipe is apt for Prasad during festivals or as a sweet munch after meals. Festivities in India are incomplete without sweets….Happy Sankranthi/Pongal !!
What is Boondi?
Boondi (pronounced as Boon-dhi) is a dish consisting of deep fried chickpea flour (aka Besan) batter, formed into tiny pearl-sized balls. You need a perforated spoon to make Boondi. The hole size in the spoon determines the size of the Boondi. Gram Flour is the next important ingredient to make boondi. Using good quality and freshly ground flour yields best Boondi. Boondi can be sweet or savoury.
Sweet Boondi:
Basically they are sugar coated gram flour balls. The sweet version calls for you to dunk the freshly-fried boondi into sugar syrup for a few seconds before draining it. Once boondis are added to the sugar syrup they will become sticky and look like a spread of sugar candya…. gooey and soft. Not to worry as the sugar crystallizes and they separate once they cool down completely. Amp up the flavour by adding ground green cardamom pods and saffron. Nuts and raisins can also be added to Boondi.
Sweet Boondi can be eaten loose as it is, or you can mix it with ghee and form it into larger balls called Boondi laddoos. They are popular temple sweets used as offerings during religious festivals.
Savoury Boondi:
The savoury version/Namkeen known as Kara Boondi where some spice powders and nuts are added to the prepared boondi. Another popular and delicious way of serving Boondi is to add to yoghurt along with a few spices….Boondi Raita. Serve with curry, Naan and Jeera Rice. It pairs particularly well with most North-Indian dishes.
Steps to follow for Sweet Boondi Recipe:
What should be the consistency of Boondi Batter?
The consistency of the batter is the key to make perfect boondi. The Boondi batter should be smooth and of a pourable consistency, similar to that of crêpe batter. The batter should be neither too thick nor too runny. Please follow the simple tricks mentioned as you read through the post and you are good to go!! Though it looks like a tedious work but trust me, its a breeze to make these!!
Do I have to use food colour?
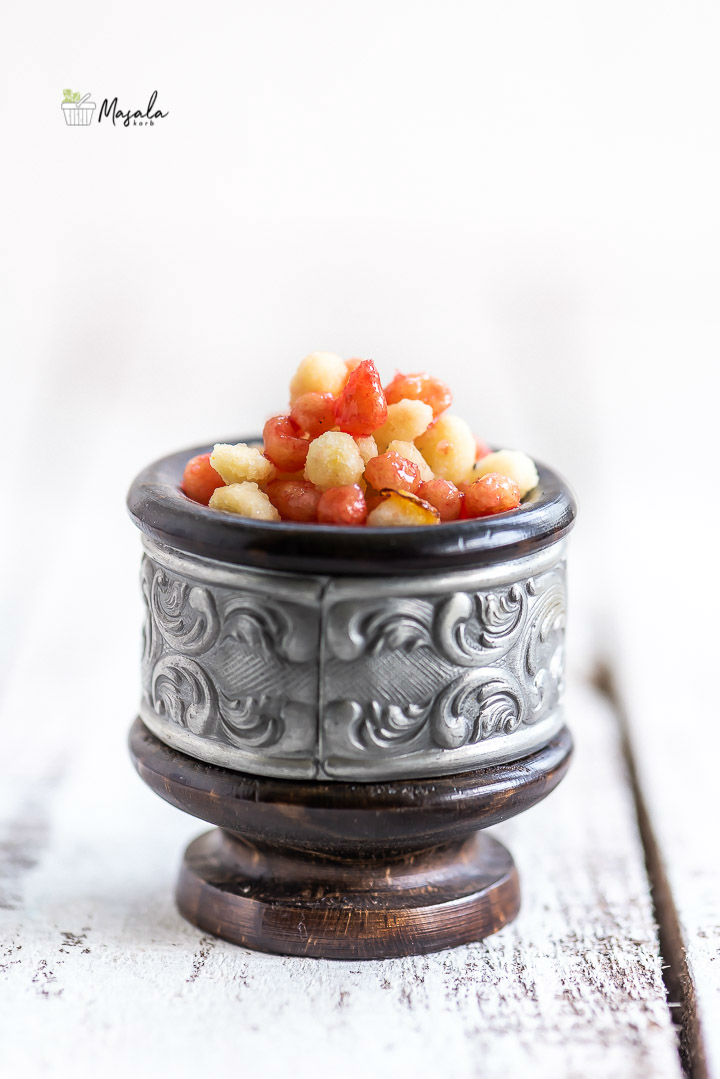
No. You can add organic food colour if you want to make it look festive. However, you can skip the food colour completely if you’d prefer not to add it. I dipped a few boondis into strawberry syrup for the red colour and a different flavour….this was just a test and they tasted yummy!!
Making Boondi Batter:
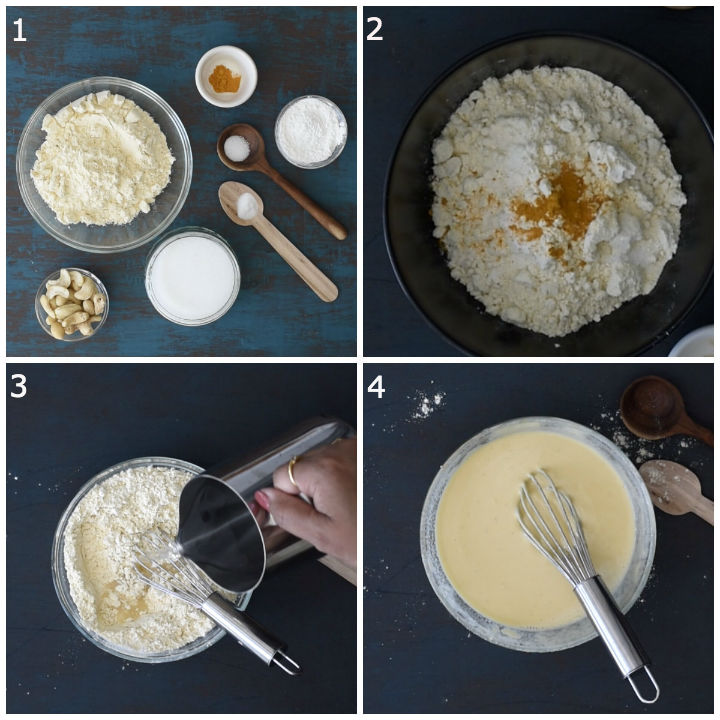
1- These are all the ingredients you will need for Sweet Boondi Recipe.
2- Sieve chickpea flour, rice flour, a pinch of salt, baking soda and little turmeric for colour (optional) in a sifter. You can also use other food colours of your choice.
3- Add in water slowly, whisk well to prevent any lumps and prepare a smooth batter.
4- The batter should be pourable, little thick but not too runny in consistency. Try to get the batter consistency perfectly, only then you will get round boondi.
What kind of oil should I use?
Any flavourless oil with a high smoke point. Sunflower or Canola oil are ideal. You could also use vegetable oil or ghee. If you use, the dish is not suitable for vegans. Refined (odourless) coconut oil is also fine to use but it’s definitely not my preferred choice. Olive oil or Sesame oil can definitely not be used.
Do I have to deep fry Boondi?
Yes!! This is one of those recipes that can only be deep fried. There is no other alternate method. Passing the droplets through a perforated skimmer into hot oil is what creates those perfectly round shaped Boondis. The oil should be hot and the Boondis will cook in just 90 seconds. Do not brown them or fry them too crisp especially for the sweet version!
Do I need any special equipment to make Boondi?
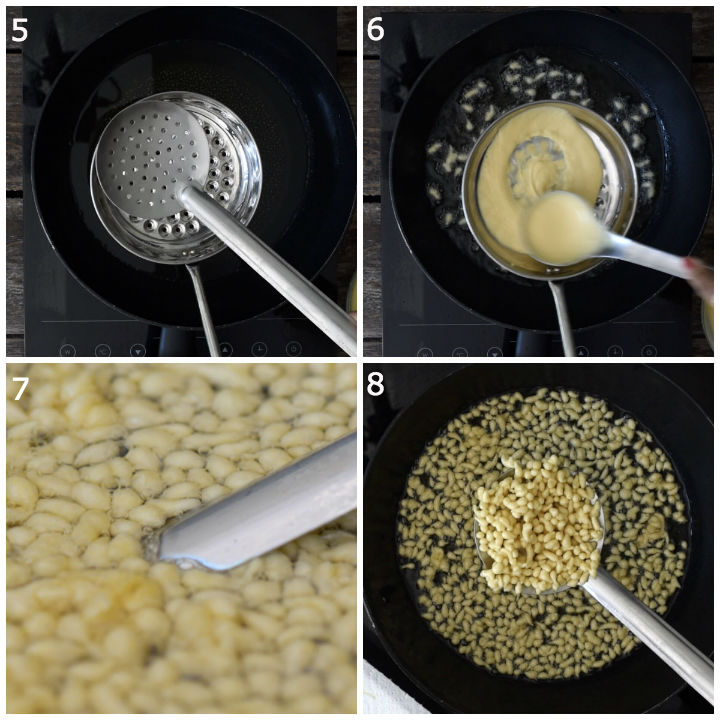
A perforated ladle (stainless stell or iron) aka boondi Jhaara is used to prepare boondi. You can have a look at the picture in step 5.
Making & Frying Boondi:
5- Heat oil over medium heat for deep-frying boondi. Take a perforated ladle as shown in the picture below (Step 5).
6- Hold it over oil. Pour a ladleful of batter over the ladle and spread it out. The boondis will fall drop by drop.
7- Fry the boondi till they are slightly crisp (Not too soft like in Boondi Ladoo or too crisp like in Kara Boondi).
8- The boondi shouldn’t become too crisp…it takes approximately 90 seconds to get the right texture. Drain them and set aside.
What consistency should the sugar syrup be?
Sugar syrup should reach one string consistency if you want dry boondi where the sugar coating crystallizes once they cool down. If you want sticky and gooey boondi, turn off the heat before it reaches one string consistency. You can also add a drop of lemon juice to prevent crystallization of the syrup.
Making Sugar Syrup:
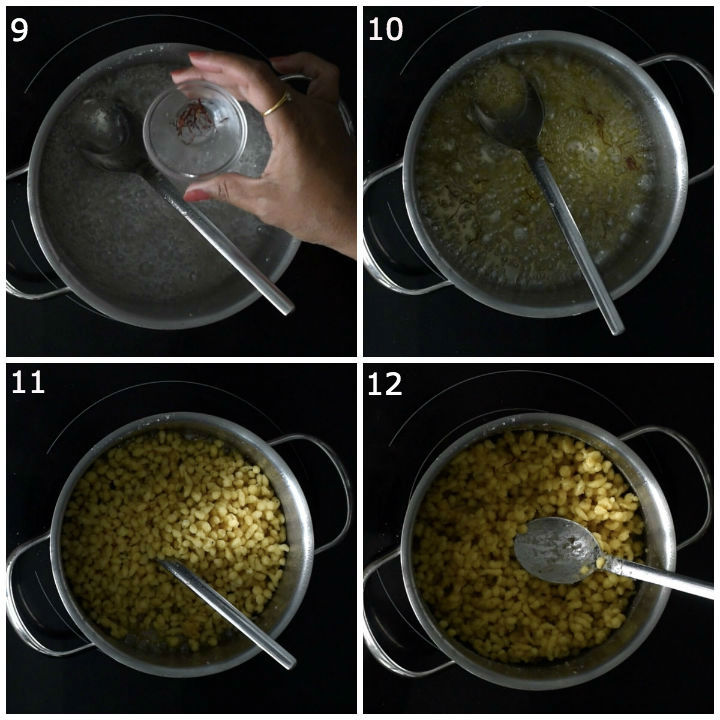
9- Take sugar and water in a deep pan and mix well. Bring it to a boil and add a few saffron strands.
10- Cook until you get a single string consistency. When you take the spoon from the syrup and see, the last drop falling from the syrup should form a single string like consistency. Check out THIS video where I demostrate how to get single string consistency.
11- At this point, turn off the heat and add the prepared boondi to the syrup.
12- Mix well and let it cool down completely. Initially they will be sticky and gooey but once they cool down, the sugar coating will crystallize and boondi will separate.
Assembling Sweet Boondi:
- Add cardamom powder, a pinch of edible camphor and nutmeg powder. Make sure you add only tiny bit of edible camphor, otherwise you get a bitter taste. Set this aside.
- Optionally, you can add the fried cashews, raisins or any nuts of your choice to the sugar coated boondi.
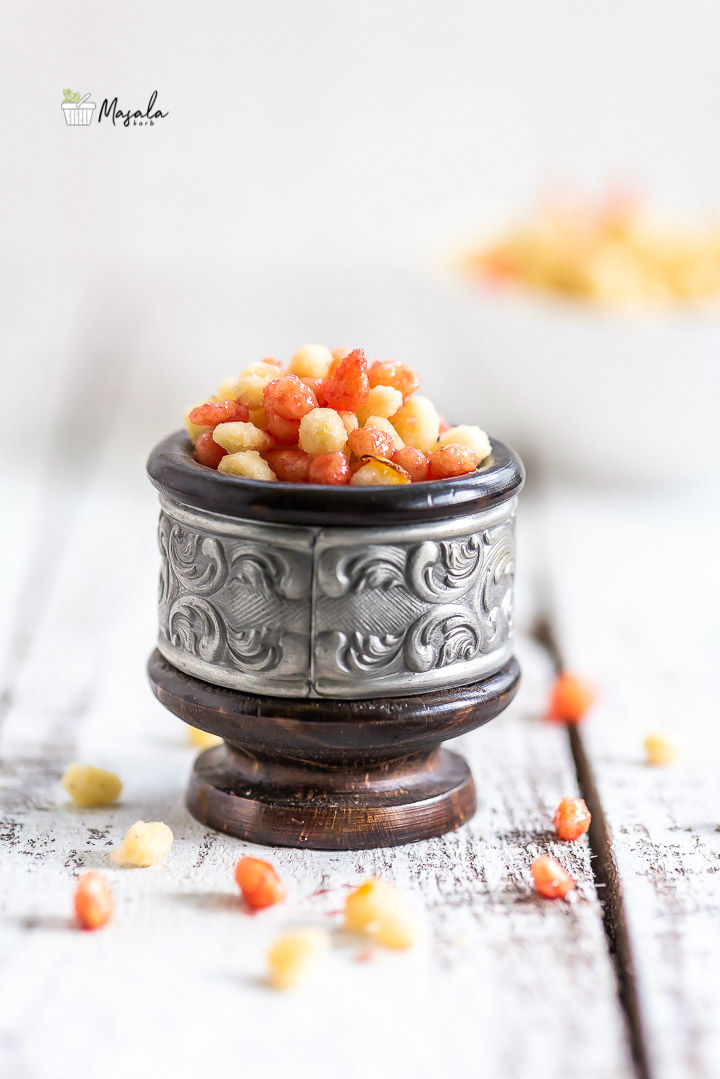
- If you are wondering how I got Red Colour Boondi…I haven’t added any colour!! I just dipped a few boondi into Strawberry Syrup and removed them….surprisingly they did taste good!!
- If you want colourful boondi, you can divide the batter into portions and add desired organic food colours (or any food colour), mix well and then prepare boondi to give it a festive look.
- Boondi can be eaten fresh, or can be stored in an airtight container to serve later for about a week or even upto 10 days. Don’t worry, they will be gone in no time. Who can resist the power of a huge batch of these sweet boondis….They are so addicting and I bet you can’t stop munching on them!
How should I serve Boondi?
Serve it warm or at room temperature. To heat it, place in a bowl and microwave for a few seconds. Sweet Boondi with vanilla ice cream is a killer combo! Sweet boondi cooked in milk, Boondi Payasam is also my favourite!!
How long can Boondi be stored for?
The Boondi will keep well in an airtight container for about a week to even 10 days. Boondi is not suitable for freezing as the freshness is lost.
Is Boondi vegan?
This loose Boondi recipe is 100% vegan if you do not opt to fry boondi in ghee. If you choose to make Laddoos with it, avoid ghee and shape them to ladoos using lukewarm water.
Is Boondi gluten free?
Yes. The batter is made with chickpea flour (besan) which is free from gluten.
Can this Boondi be made into laddoos?
Yes. To make Laddoos with this Boondi, add some melted ghee (or lukewarm water) when boondi is still hot, mix and shape to Ladoos.
Sweet Boondi Recipe | Meethi Boondi
Ingredients
For Making Boondi:
- 1 Cup Chickpea Flour Gram flour/Besan
- 2 tbsp Rice Flour
- ¼ tsp Salt
- A pinch of cooking Soda
- ¼ tsp Turmeric Powder Optional (Or any food colour)
- ½ Cup Water or as required to make batter
For the Sugar syrup:
- 3/4 Cup Sugar
- ½ Cup Water or as required
Other Ingredients:
- ½ tsp Cardamom Powder
- A pinch of Edible Camphor
- A pinch of Nutmeg powder
- Few Cashews Fried until light brown in 1 tsp butter or ghee
- Few Raisins (optional), fried as above
- Oil required for deep-frying
Instructions
Making Boondi:
- Sieve chickpea flour, rice flour, a pinch of salt, cooking soda and a little turmeric in a sifter.
- Add in water slowly and make it into a smooth batter.
- The batter should be little thick but not runny consistency.
Making & Frying Boondi:
- Now, heat oil over medium heat for deep-frying boondi.
- Take a perforated ladle. Hold it over oil. Pour a ladleful of batter over the ladle and spread it out. The boondis will fall drop by drop.
- Fry the boondi till they are slightly crisp. The boondi shouldn’t become too crisp. Drain them and set aside.
Making the Sugar Syrup:
- Take sugar and water in a deep pan and mix well.
- Bring it to a boil and cook it to a single string consistency.
- At this point, turn off the heat and add the boondi to the syrup.
Making Sweet Boondi:
- Mix well and then add cardamom powder, a pinch of edible camphor and nutmeg powder. Set this aside.
- Add the fried cashews to the sugar coated boondi and mix well.
- Cool down and store in an airtight jar for about a week.
Recipe Video
Notes
- The consistency of the batter is very important to get perfect boondi shape. Batter should be of dropping consistency – neither too thick nor too thin.
- Use a ladle with larger holes if you want bigger boondis.
- Do not fry boondi for very long, it becomes crispy. The boondi should be slightly crisp and not too soft.
- Adjust sugar to suit your taste but don't reduce too much as you will need enough to coat all the boondis with sugar.
- You can also use ghee to fry boondi. It’s your choice but I prefer oil.
- If you do not prefer crisper sugar coated boondi, do not bring the sugar syrup to single string consistency. Turn off the heat when it's like Gulab Jamun syrup consistency.
- The sugar syrup should be warm while adding the boondi.
- For coloured boondi, you can add food colour to the batter or to the sugar syrup.
Check out some SANKRANTI RECIPES from blog!!
Check out other similar categories from blog:
Below are some popular sweets from blog:
And many more to come!!…..Stay Tuned!!
Hungry for more? Never miss a recipe!!…Subscribe to MasalaKorb and have posts delivered straight to your inbox! And connect with me on Facebook, Google, Twitter, Instagram and Pinterest for all of the latest updates.
Do subscribe to my YouTube Channel for latest video alerts!!
Did you make a recipe? Make sure to tag your photo with this hashtag: #masalakorb
Happy Cooking
Cheers!!
Padma


Leave a Reply