Chicken Dum Biryani Hyderabadi Style | Chicken Dum Biryani Recipe | Zero Oil Chicken Biryani | This Easy Chicken Biryani Recipe is a kachchi biriyani where raw marinated meat is placed on the bottom of the pot and then layered with half cooked rice. It is then sealed and cooked on a low flame or DUM method, where the rice is cooked with steam generated by air tight environment.
 Celebrating My 100th Blog Post Chicken Dum Biriyani, my signature recipe!!
In November of last year I unleashed my very first blog post into the world and I still can’t forget the feel, excitement, curiosity…….. when I hit the publish button for the first time. I just can’t believe it, but here it is my 100th blog post!! I know for most folks it’s just a number, but it means a lot to me. However, the journey towards my 100th blog post wasn’t all moonlight and roses.
Blogging is a ton of work – yes, I know that sounds weird for someone who is trying to gather as much assets as possible so he doesn’t need to work anymore and what matters are just figures. You know what I mean?????….This blog has been such a wonderful journey so far. I’ve met so many wonderful and talented people in the last few months, received so much love through the comments, it’s heart touching and has very often made my day. I don’t think I can ever give this up easily.
I’d like to take a moment to say “Thank You”
I would like to thank each and every one of you who is following my blog, everyone who takes the time to comment on my posts and every single one who visits the blog. I love hearing from everyone, so I’d love if you could keep the love coming and showering on me!!! It’s all your support and encouragement that strives me to work harder to give my best. Once again thank you for being such an incredibly generous and stimulating audience. I hope to be able to write the same thing another one hundred posts…. and more down the line!!!
Today’s recipe is one of the top listed favourites among family and friends. I got lot of requests, especially from friends, to post this particular recipe, but somehow I made up my mind at the beginning of my blogging journey that this recipe is going to be “My 100th Blog Post Chicken Dum Biriyani”. And here I’m today sharing this wonderful recipe with all of you. Hope you recreate it in your kitchen and enjoy as much as we do!!
Hyderabadi Dum Biryani is the king of all biryanis. Biryani originated in Persia and might have taken couple of different routes to arrive in India. It is a mixture of original Andhra cuisine and Hyderabadi cuisine, having Mughlai influence.
Basically, there are two kinds of Biryani:
- Pakki Biryani
- Kachchi Biryani.
Today I’m going to share the making of Kachchi Biryani as “My 100th Blog Post Chicken Dum Biriyani”. It is a biryani where raw marinated meat placed on the bottom of the pot and then layer with par boiled rice, seal and cook on a low flame for hours, so that the rice is cooked with steam generated by air tight environment. This entire process is known as DUM method. As a result you are getting juicy and succulent pieces of meat which gives you the melt in your mouth feeling and each rice grain is well separated and cooked nicely. Nothing can beat the aroma of a perfectly cooked biryani with each rice grain separated and the meat cooked succulent and tender.
What is special about this Chicken Dum Biryani Hyderabadi Style ?
- This is a healthier alternate to any biriyani because this biriyani is made with just one tablespoon of oil and no ghee or no butter. If you want it totally oil free, skip caramelising onions.
- Simpler way to recreate this wonderful biriyani without any mess because I will walk you through easy steps to make it with a regular pressure cooker compared to the lengthy process involved in the traditional method.
- Last but not the least- all the spice mixes used in this recipe are all homemade, no store bought masala mixes.
This is more of a Hyderabadi style biriyani with my own twists and turns as usual. At the end of the day it really doesn’t matter to me if the biryani is from Hyderabad or any other region. What matters is the aroma, taste and how it is presented. I’m totally obsessed with biriyanis and cannot resist!!
Off to Chicken Dum Biryani Hyderabadi Style !!
Easy Steps to follow for
Chicken Dum Biryani Hyderabadi Style
The process to prepare Chicken Dum Biryani Hyderabadi Style involves the following main steps-
- Marinating the chicken
- Caramelising Onions
- Cooking rice
- Layering meat and rice and cooking
1. Marinating chicken:
- Clean chicken, wash and cut into big pieces.
- To the chicken add 1 teaspoon of red chilli powder and 1 teaspoon of salt. Rub well into the chicken and set aside.
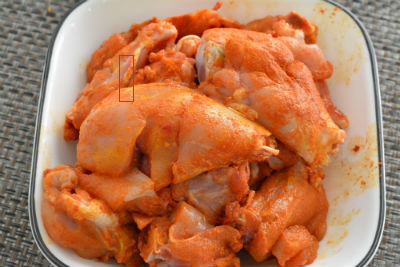
- In a large bowl, add all the ingredients under the list “For marination” and mix well.
- To start with take 2 cups yoghurt in a large bowl, add juice form 1 lemon, 1 teaspoon Red chilli powder, 2 Tablespoons Ginger garlic paste and ½ teaspoon Turmeric powder.
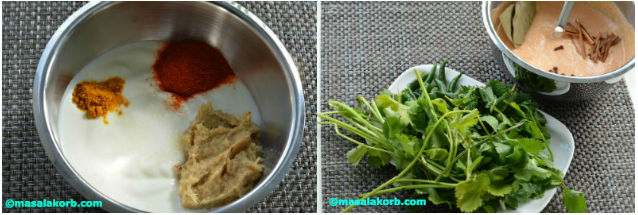
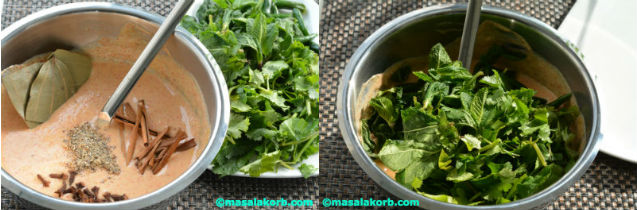
- Add ½ teaspoon garam masala powder, 2 inch cinnamon sticks, 10 Cloves, 1 teaspoon cardamom powder, 1 teaspoon shahjeera or caraway seeds and 2 bay leaves.
- Add 1 cup mint leaves (Pudina), half a cup finely chopped coriander, finely chopped, 8 to 10 green chillies(broken into 2 halves), required salt and mix well.
NOTE: Remember that you have already added some red chilli powder and salt to the chicken. The ginger garlic paste also has some salt if you have followed my my recipe to make homemade ginger garlic paste.
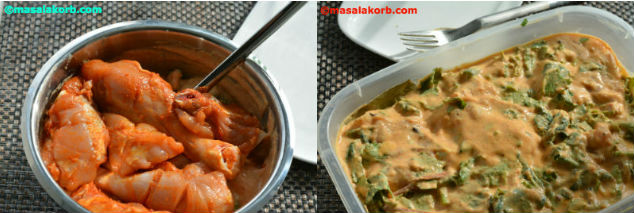
- To this add the chicken pieces and rub the marinade well into the chicken.
- Mix well and store it in the refrigerator for 4 to 5 hours or preferably overnight. The longer the chicken marinates, the better the flavours will be infused into the chicken.
2. Caramelising onions:
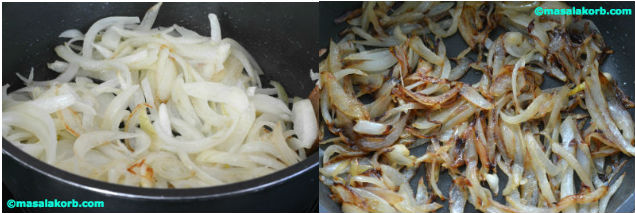
- Thinly slice 2 large onions and set aside.
- For caramelising onions, heat a pan with 1 tablespoon oil, add sliced onions and fry till golden brown over medium heat.
- Add a pinch of salt so that even with very little oil, the onions get caramelised well.
3.Rice Preparation:
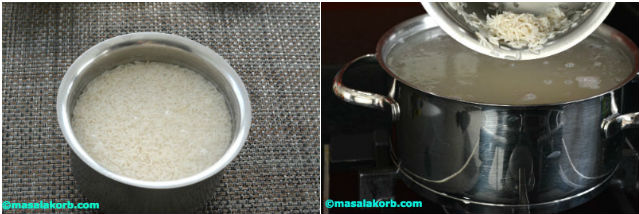
- Soaking the rice is very important because it helps the rice expand to maximum length. So soak it in the water for 30 minutes. Choose long grain basmati rice. While the rice is soaking, use the time to caramelise onions (see above step).
- In a large pan, bring about 10 cups or surplus amount water to boil.
- Add salt to the water and rice once the water starts to boil. Don’t worry about adding salt because most of the salt will go off while draining water from rice.
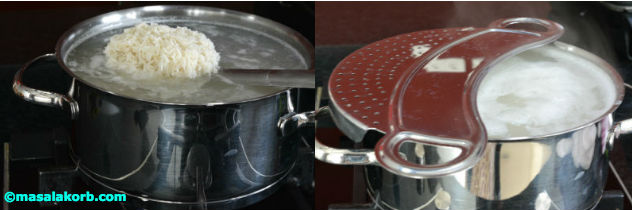
- Turn off the heat once the rice is half cooked. It may just take about 2 to 3 minutes. Keep an eye, as the rice should not be fully cooked.
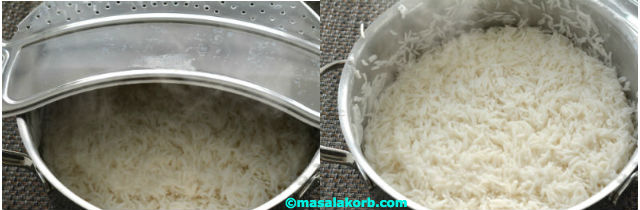
- Now drain the water completely from the rice.
4. Layering Chicken and Rice:
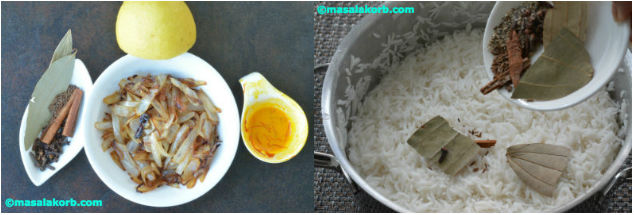
- To the half cooked rice add all the ingredients under the list “Dry masalas to add to the rice”. Add 2 inch cinnamon sticks, 10 cloves, 1 tsp Cardamom powder, 1 tsp shah jeera & 2 bay leaves. Mix well & layer it on top of the chicken.
- Soak saffron strands in lukewarm milk.
- Squeeze lemon juice and set aside.
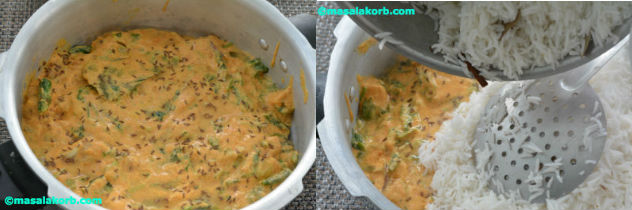
- Take a wide bottomed pressure cooker and arrange the chicken in a single layer.
- Then add rice mixed with spices on over the meat layer.
- While you keep water for boiling to cook rice, start the process to arrange meat in the pressure pan, as the rice should be added while it is still hot.
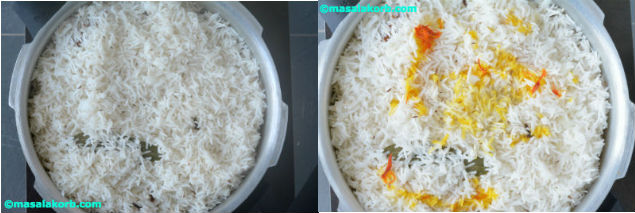
- Now spread saffron milk and lemon juice evenly over the rice.
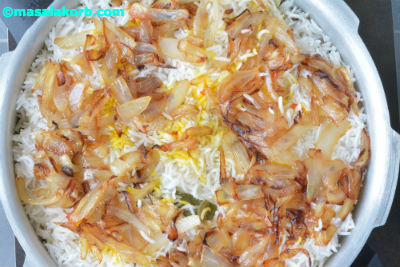
- Finally spread the fried onions over the rice.
- After layering the rice and meat, It is also important to leave around 1/4th of the vessel free for the steam to collect and aid in cooking.
Cooking on Dum:
- Close the lid of the pressure cooker (without weight) and place the cooker over high heat for 5 minutes.
- After 5 minutes, you can see the steam escaping. At this stage place the weight and reduce the heat to medium. Let it cook for 15 minutes over medium, just ensure that the whistle shouldn’t come.
- Finally reduce the heat to low and leave it for another 5 to 8 minutes. By now the aroma of the biriyani spreads in the entire house.
- Turn off the heat and open the lid of the cooker once the pressure subsides.
- It is good idea to open the lid after 15 minutes. Be careful when you are opening the lid out, because the steam can be dangerous.
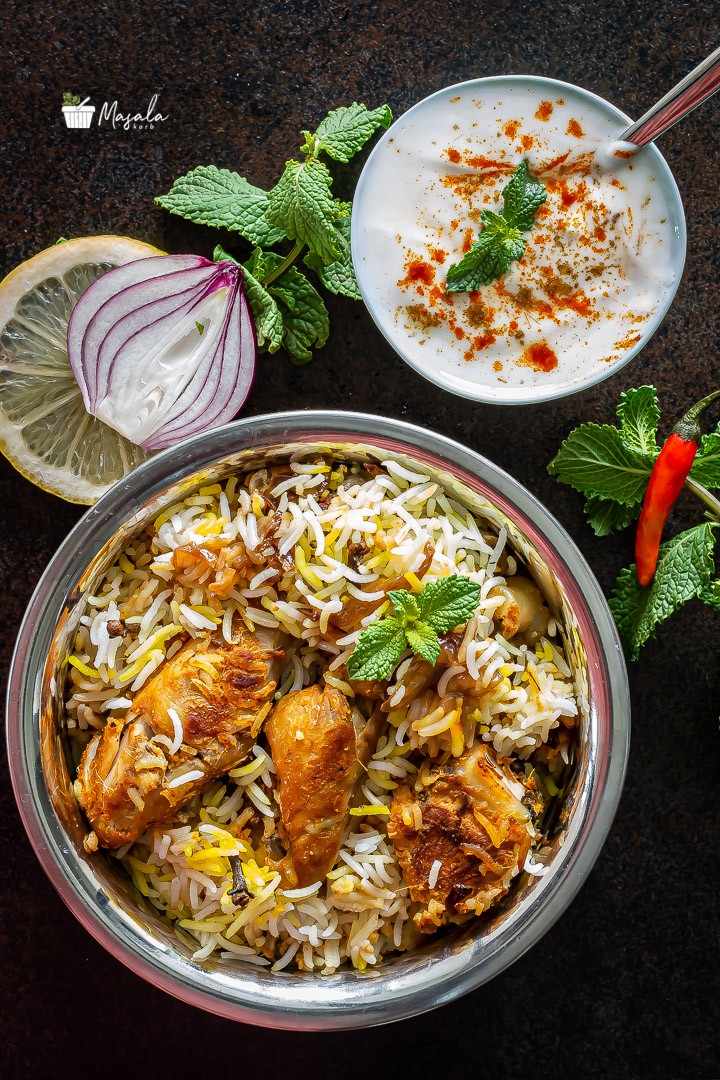
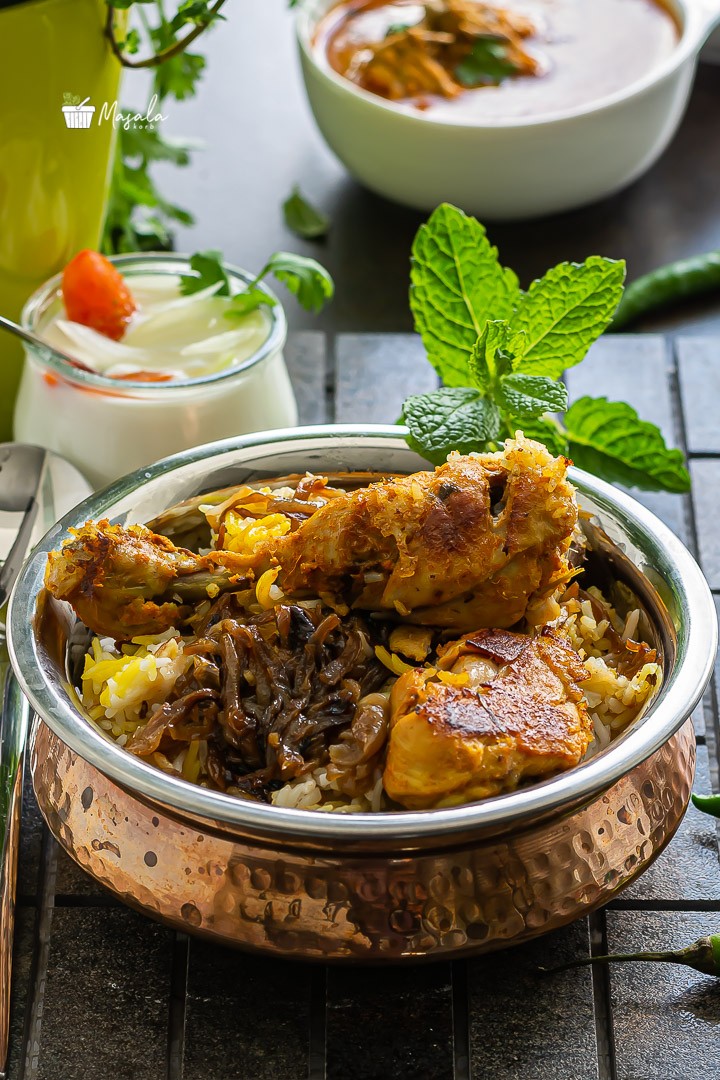
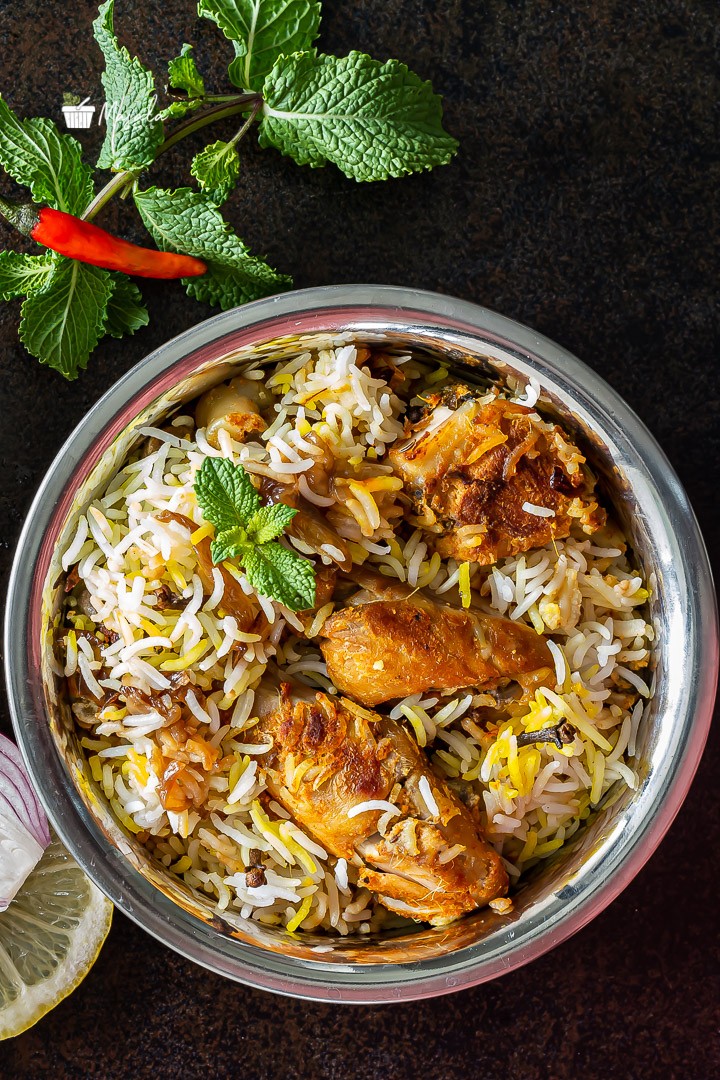
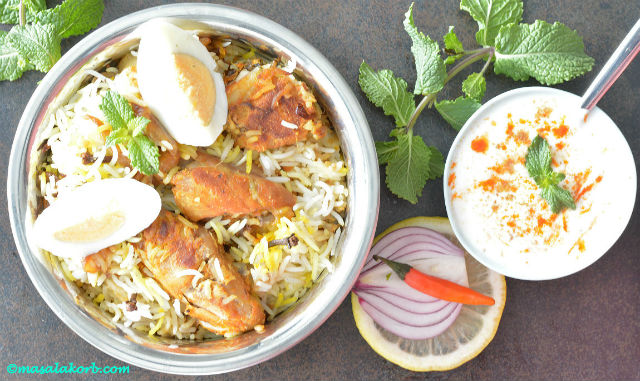
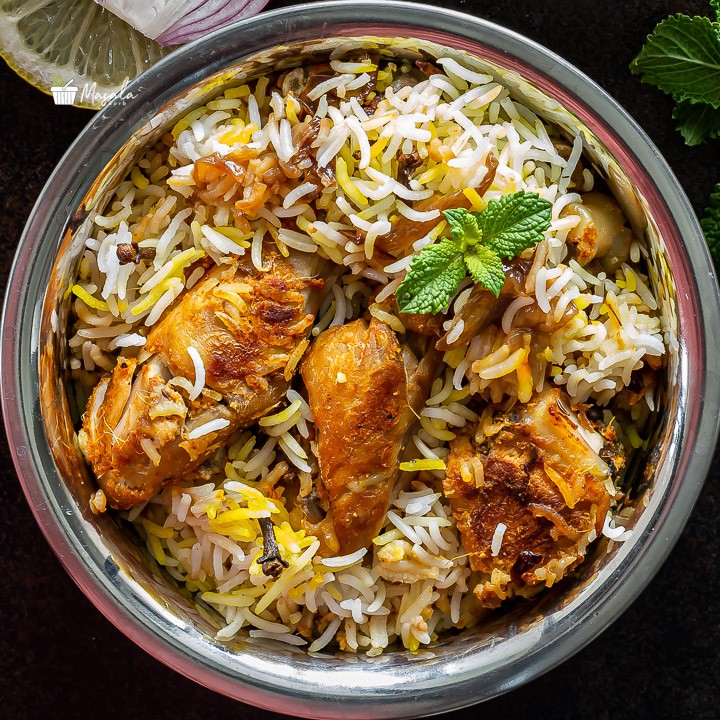
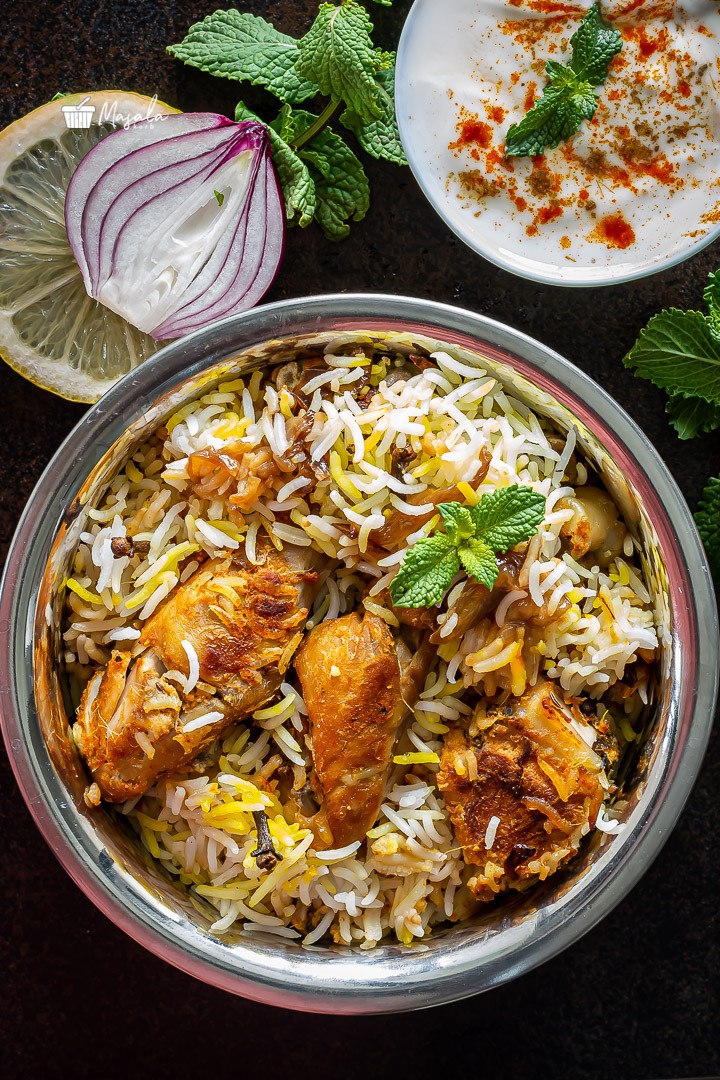
Your Chicken dum biryani is ready! There is a special cut of biryani. Put a spatula at the edge of the vessel and lift it up carefully and loosen the rice. You can see that the chicken pieces at the bottom are so well cooked and get a nice golden brown colour to them. This is the tricky part, and you will master it in no time!!
How to Serve Chicken Dum Biryani Hyderabadi Style
Serve Chicken dum biriyani with chicken curry or chicken korma along with onion raitha and some thinly sliced raw onions soaked in lemon juice for 10 minutes.
Hadrabadi biriyani is usually serve with Mirch ka Salan but somehow I could not befriend it, anyway I will share the recipe in the future.
My way of eating any biriyani – Just plain dum biriyani with raw onions soaked in lemon juice…and some raitha at the end. In fact today I made boodi raitha. I don’t like to mix any curry to my biriyani but that’s purely individual!!

NOTE:
- Alternatively you can also cook Chicken Dum Biryani Hyderabadi Style the traditional way in a large vessel and seal the edges with wheat flour dough or you can also use a piece of aluminium foil to seal. I will share this method later but trust me the above method is just simple and perfect to make awesome biriyani!!
- After adding fried onions, you can add 1 to 2 tablespoons of butter or ghee if you prefer to.
- You can also add a tablespoon of ghee/butter or oil to the chicken while marinating.
- When I make “My 100th Blog Post Chicken Dum Biriyani” only for us at home, I usually use only 1 tablespoon of oil to caramelise onions. So please feel free to follow any of the above!!
Chicken Dum Biryani Hyderabadi Style | Easy Chicken Biryani Recipe
Ingredients
Main ingredient
- 750 grams Chicken Cleaned & Cut into big pieces and make small slits with a knife
For Marination:
- 1 ½ cups Yoghurt
- 2 tbsp Lemon Juice
- 1 ½ tsp Red chilli powder divided
- 2 tbsp Ginger garlic paste
- ½ tsp Turmeric Powder
- 1/4 tsp Garam masala powder
- 2 inch Cinnamon Sticks
- 10 Cloves
- 1/4 tsp Cardamom Powder
- ½ tsp Shah Jeera Black Cumin Seeds or Caraway Seeds
- 2 Bay Leaves
- Handful Mint Leaves Pudina, tightly packed
- Handful Coriander Finely chopped
- 8 to 10 Green Chillies Halved
- 1 ½ tsp Salt Or as required to your taste
Cooking Rice:
- 2 ½ Cups Basmati Rice soaked in water for 30 minutes
- 8 Cups Water
- 1 tsp Salt
Dry Spices to add to Rice:
- 2 inch Cinnamon Sticks
- 10 Cloves
- ½ tsp Cardamom Powder
- ½ tsp Shah Jeera Black Cumin Seeds or Caraway Seeds
- 2 Bay Leaves
Caramelising Onions:
- 2 Large Onions Thinly Sliced
- 1 tbsp Oil
For Saffron milk:
- Few Saffron Strands dissolved in 1 Tablespoon lukewarm milk
Layering Chicken & Rice:
- Marinated chicken
- Half cooked rice
- Saffron Milk
- 2 tbsp Lemon Juice
- Caramelised Onions
For garnish:
- 1 Onion thinly sliced in circular rounds and soaked in a teaspoon of lemon juice
Instructions
Marinating the chicken:
- To the cleaned chicken add 1 teaspoon of red chilli powder and 1 teaspoon of salt. Rub well into the chicken and set aside.
- In a large bowl, add all the ingredients under the list “For marination” and mix well.
- To this add the cleaned chicken pieces and rub the marinade well into the chicken.
Cooking rice:
- In a large pan, bring about 10 cups or surplus amount water to boil.
- Add salt to the water.
- Add rice once water starts boiling.
- Turn off the heat once the rice is half cooked. It may just take about 2 to 3 minutes.
- Now drain the water completely from the rice.
Caramelise Onions:
- While the water is boiling in the above step, heat 1 oil over medium heat and fry onions till golden brown and set aside.
Layering and Cooking:
- Take a wide bottomed pressure cooker and arrange marinated chicken in a single layer.
- To the half cooked rice add all the ingredients under the list “Dry masalas to add to the rice” and mix well.
- Add the rice on the layered chicken.
- Now spread saffron milk and lemon juice evenly over the rice.
- Finally spread the fried onions over the rice.
- Close the lid of the pressure cooker (without weight) and place the cooker over high heat for 5 minutes.
- Now you can see the steam escaping, at this stage place the weight and reduce the heat to medium low. Let it cook for 15 minutes, just ensure that the whistle shouldn’t come.
- Finally reduce the heat to low and leave it for another 5 to 8 minutes.
- Turn off the heat and open the lid of the cooker once the pressure subsides.
- Chicken dum biryani is ready. Put a spatula at the edge of the vessel and lift it up carefully and loosen it. You can see that the chicken pieces at the bottom are so well cooked and get a nice golden brown colour to them.
- Serve with Chicken curry or raita or just with some raw onions soaked in lemon juice.
Recipe Video
Notes
- If you are a novice cook or making it for the first time, please follow the instructions given in the post.
- Adjust spice levels to suit your taste but my suggestion is to try with thses measurements.
- Use best quality aged Basmati rice, good quality chicken and the best saffron available.
- Marinate chicken for at least 4-6 hrs and if running out of time then two hours will do.
- No substitutes and no compromise in any ingredients for this particular recipe.
- If you want you can include some butter or ghee, add it over the rice and also while marinating the chicken.
YOU MAY WANT TO CHECK OTHER NON VEGETARIAN RECIPES FROM MY BLOG.
FEW POPULAR ONES ARE:
- Classic Andhra Style Chicken Curry
- South Indian Style Chicken Fry
- Crab Curry
- Fish Pulusu
- Fish Fry
- Egg Curry
- Masala Egg Fry
Check out few popular chicken recipes from my blog.
Many more to come!!…..STAY TUNED!!
Hungry for more? Never miss a recipe!!…Subscribe to MasalaKorb and have posts delivered straight to your inbox! And connect with me on Facebook, Google, Twitter, Instagram and Pinterest for all of the latest updates.
Do subscribe to my YouTube Channel for latest video alerts!!
If you cook this dish, be sure to tag your photo with this hashtag: #masalakorb
Happy Cooking 
Cheers!!
Padma.
